Day 4 · Networking IV — Nginx, Reverse Proxy & TLS
Four days of networking come together today. You can address machines, resolve names, and reach them securely — now you'll run the thing that serves them. Nginx is the front door of most of the internet: it hands out static files, wraps them in HTTPS, records every request, forwards traffic to your app, and spreads load across many app copies. Build all of it, and Operation Go Live has its web tier.
Learning Objectives
- Install and run Nginx and understand its configuration layout
- Serve static assets from a
serverblock (virtual host) - Generate a self-signed SSL certificate and serve your site over HTTPS
- Shape Nginx access logs with a custom
log_format - Put Nginx in front of a Python API as a reverse proxy
- Spread traffic across multiple backends as a load balancer
Theory · ~20 min
1. What a web server actually does
A web server listens on a port (80 for HTTP, 443 for HTTPS) and, for each request, does one of four jobs:
| Job | Meaning |
|---|---|
| Serve static files | Hand back HTML/CSS/JS/images from disk |
| Terminate TLS | Handle HTTPS so the app behind it can speak plain HTTP |
| Reverse proxy | Forward the request to a backend app and relay its reply |
| Load balance | Distribute requests across several backends |
Nginx ("engine-x") does all four and is the most-deployed web server in the world. Its event-driven model handles thousands of connections cheaply — which is why it usually sits at the front of production stacks. Every reply carries a status code: 2xx success, 3xx redirect, 4xx the client erred (404 not found), 5xx the server erred (502 bad gateway) — you'll read these in the logs later today.
📺 Watch — NGINX Explained in 100 Seconds (Fireship, ~2 min)
A 2-minute primer on what Nginx is and why it sits at the front of the stack. Watch this first, then the deep dive in Section 2.

Chapters: what is Nginx · configuration · reverse proxy
2. Nginx config layout
/etc/nginx/
├── nginx.conf          ← global settings; includes the rest
├── conf.d/             ← extra http-level config (e.g. log formats)
├── sites-available/    ← every site config you've written (may be inactive)
├── sites-enabled/      ← symlinks to the ones that are ON
└── snippets/           ← reusable fragments (e.g. TLS settings)
The unit of config is a server block — Nginx's virtual host. It decides how to answer requests for a given name/port:
server {
    listen 80;
    server_name example.com;      # which hostname this block answers for
    root /var/www/example;        # where files live
    index index.html;

    location / {                  # match URL paths
        try_files $uri $uri/ =404;
    }
}
try_files $uri $uri/ =404 means: try the file, then the directory, else return 404.
📺 Deep dive — NGINX for Beginners (KodeKloud, full tutorial)
Want more than the 100-second version? This chaptered walkthrough covers the config model in depth.

Chapters: config file structure · server blocks & virtual hosts · directory structure · essential commands · install on Ubuntu · reverse proxy & load balancing
3. TLS & self-signed certificates — the padlock
TLS (Transport Layer Security; the successor to SSL) encrypts the connection so nobody between client and server can read or tamper with it. When Nginx "terminates TLS," it holds the certificate and does the crypto, handing plain HTTP to your app behind it.
📺 Watch — SSL, TLS, HTTPS Explained (ByteByteGo, ~6 min)
A crisp animated explainer of the handshake below. Watch it, then read the step-by-step walk-through.
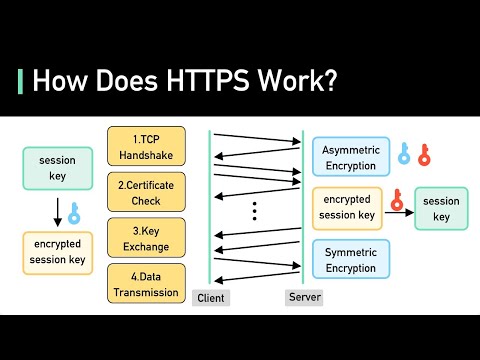
How a secure connection is established — a simple walk-through:
- Browser connects to the server and asks for a secure connection.
- Server sends its certificate (the domain, a public key, an expiry, and a CA's signature).
- Browser checks the certificate: is it for this site, and still valid (not expired)?
- Browser checks who issued it — a Certificate Authority (CA) — and whether it trusts that CA (browsers ship with a pre-installed list of trusted CAs).
- If the CA is trusted and everything checks out, the two agree on a session key and the connection is trusted and encrypted.
A certificate is a key pair plus an identity, sealed by a signature:
| Piece | What it is |
|---|---|
| Private key | A secret you generate and never share; does the decryption/signing |
| Public key | Derived from the private key, safe to hand out; ends up inside the certificate |
| CSR (Certificate Signing Request) | Your public key + identity (domain, org), bundled so a CA can sign it |
Who signs the CSR is the only difference between the two paths:
CA-signed:    you ─CSR─▶ Certificate Authority ─signs with CA key─▶ trusted cert
Self-signed:  you ─────▶ sign it with your OWN key ──────────────▶ untrusted cert
A self-signed cert skips the CA — the same key that owns the cert also signs it. The crypto is identical to a real one, but no browser has your key in its trust store, so it warns. That's the trade-off for a cert you can mint offline yourself.
| Type | Trusted by browsers? | Use |
|---|---|---|
| Self-signed | No (warning shown) | Local dev, internal tools — today's lab |
| Let's Encrypt | Yes (free, automated CA) | Public sites — your Week 4 Go-Live |
| Commercial CA | Yes (paid) | Enterprise/EV needs |
Self-signed today, Let's Encrypt in production
A real Let's Encrypt cert needs a public domain pointing at a reachable server on port 80 to validate, which you'll have in Week 4 on a real cloud box. certbot automates the same CSR-to-CA round trip you'd otherwise do by hand. See Advanced Topics.
Generate and self-sign one with openssl — a single command makes the private key and the certificate together:
openssl req -x509 -nodes -days 365 -newkey rsa:2048 \
  -keyout golive.key -out golive.crt \
  -subj "/CN=localhost" \
  -addext "subjectAltName=DNS:localhost,IP:127.0.0.1"
-x509 says "self-sign directly" (no CSR sent anywhere), -newkey rsa:2048 generates a fresh 2048-bit key at the same time, and -nodes leaves it passphrase-free so Nginx can start unattended. The subjectAltName (SAN) lists the names the cert is valid for — modern clients match the hostname against the SAN, not the CN, so a cert without one fails verification even when trusted. Inspect what you issued — decode the certificate into human-readable form to check the subject, validity dates, and public key:
Point Nginx at the pair with two directives inside the HTTPS server block:
server {
    listen 443 ssl;
    ssl_certificate     /etc/nginx/certs/golive.crt;   # the certificate (public)
    ssl_certificate_key /etc/nginx/certs/golive.key;   # the private key (secret)
}
4. Reverse proxy vs load balancer
A reverse proxy stands in front of one backend app and forwards to it — the client only ever talks to Nginx. Turn one backend into a pool and Nginx becomes a load balancer, rotating requests across them (round-robin by default) so no single app instance is overwhelmed and any one can die without downtime.
Run a backend on several ports to see this for real. Any tiny server works (a Docker container, a Node app…); the simplest is Python's built-in one, launched three times:
# The same "app" on three ports
for p in 3001 3002 3003; do
  python3 -m http.server "$p" --bind 127.0.0.1 &
done
Then declare those three as an upstream pool and forward to it — one backend makes Nginx a reverse proxy, a pool makes it a load balancer:
upstream app_pool {
    server 127.0.0.1:3001;
    server 127.0.0.1:3002;
    server 127.0.0.1:3003;
}

server {
    listen 80;
    location / {
        proxy_pass http://app_pool;    # round-robins across 3001 → 3002 → 3003
    }
}
5. Logs — every request, recorded
Nginx writes an access log line per request and an error log line per failure. Two directives shape the access log, and where each one goes matters:
log_formatnames a line shape — it must live in the top-levelhttpblock (define it once, globally).access_logswitches logging on and picks a format by name — it goes in aserver(orlocation) block.
http {
    log_format golive '$remote_addr [$time_local] "$request" $status ${request_time}s';   # define once, here

    server {
        access_log /var/log/nginx/golive_access.log golive;   # use it per-site, by name
    }
}
A request then lands in the log as one line — each $variable filled in for that request:
Here $status tells you it was a 200 and $request_time that it took a millisecond. Putting log_format inside a server block is the #1 beginner mistake — Nginx refuses to start with "log_format" directive is not allowed here. Good log shape is how you later answer "which requests are slow?" and "who's getting 502s?".
Lab · ~50 min
Work inside your Vagrant VM. (If you enabled ufw on Day 3, ports 80 and 443 are already allowed.) Each step evolves the same golive site, so keep going in order.
Step 1 — Install & start Nginx
sudo apt update && sudo apt install -y nginx
sudo systemctl enable --now nginx
curl -I http://localhost                # 200 OK from the Nginx default page
Step 2 — Serve a static site
sudo mkdir -p /var/www/golive
sudo tee /var/www/golive/index.html << 'EOF'
<!DOCTYPE html>
<html>
  <head><title>Operation Go Live</title></head>
  <body><h1>Served by Nginx 🚀</h1><p>Static assets, live.</p></body>
</html>
EOF
sudo chown -R www-data:www-data /var/www/golive

sudo tee /etc/nginx/sites-available/golive << 'EOF'
server {
    listen 80;
    server_name localhost;

    root /var/www/golive;
    index index.html;

    location / {
        try_files $uri $uri/ =404;
    }
}
EOF

sudo ln -sf /etc/nginx/sites-available/golive /etc/nginx/sites-enabled/
sudo rm -f /etc/nginx/sites-enabled/default    # disable the default site
sudo nginx -t                                  # ALWAYS test before reloading
sudo systemctl reload nginx

curl http://localhost                          # your page
nginx -t then reload, every time
nginx -t validates the config; reload applies it with zero downtime (existing connections finish). Never restart a busy server when reload will do.
Step 3 — Generate a self-signed certificate & serve HTTPS
First mint a key + self-signed cert in one openssl command:
sudo mkdir -p /etc/nginx/certs
sudo openssl req -x509 -nodes -days 365 -newkey rsa:2048 \
  -keyout /etc/nginx/certs/golive.key \
  -out    /etc/nginx/certs/golive.crt \
  -subj "/C=NP/ST=Bagmati/L=Kathmandu/O=DevOpsMonth/CN=localhost" \
  -addext "subjectAltName=DNS:localhost,IP:127.0.0.1"
What each flag does:
| Flag | Meaning |
|---|---|
req -x509 |
Make a self-signed certificate directly (skip the CSR-to-CA round trip) |
-newkey rsa:2048 |
Generate a fresh 2048-bit RSA private key at the same time |
-nodes |
Don't passphrase-encrypt the key, so Nginx can start unattended |
-days 365 |
Valid for a year — self-signed certs have no auto-renewal |
-keyout / -out |
Where to write the private key and the certificate |
-subj |
Identity fields; CN (Common Name) is the primary hostname |
-addext |
Subject Alternative Name — the hostnames/IPs the cert is valid for; modern clients match against this, not CN |
Now redirect HTTP to HTTPS and serve the site over TLS:
sudo tee /etc/nginx/sites-available/golive << 'EOF'
# Redirect all HTTP to HTTPS
server {
    listen 80;
    server_name localhost;
    return 301 https://$host$request_uri;
}

# HTTPS
server {
    listen 443 ssl;
    server_name localhost;

    ssl_certificate     /etc/nginx/certs/golive.crt;
    ssl_certificate_key /etc/nginx/certs/golive.key;

    root /var/www/golive;
    index index.html;

    location / {
        try_files $uri $uri/ =404;
    }
}
EOF

sudo nginx -t && sudo systemctl reload nginx

curl -kI https://localhost          # -k skips verification; note "HTTP/1.1 200"
curl -I  http://localhost           # note the 301 redirect to https

# Verify properly instead of skipping: trust the cert as a CA. Works because it
# now has a matching SAN — without -addext above, this would fail on the hostname.
curl --cacert /etc/nginx/certs/golive.crt https://localhost
Inspect the certificate you issued:
The browser would warn (untrusted signer), but the connection is fully encrypted — the same TLS a real cert uses.
Step 4 — Shape your access logs
As the theory noted, log_format must sit in the http block — not in your site's server block. Ubuntu's nginx.conf pulls every file in conf.d/ into that http block, so dropping the format there is the clean place for it. The access_log that uses the format then goes in the server block. First, the format:
sudo tee /etc/nginx/conf.d/golive_log.conf << 'EOF'
log_format golive '$remote_addr [$time_local] "$request" '
                  '$status ${body_bytes_sent}b ${request_time}s '
                  '"$http_user_agent"';
EOF
Now rewrite the site config with the access_log line added to the HTTPS server block — this is the full file, so you can just replace it:
sudo tee /etc/nginx/sites-available/golive << 'EOF'
# Redirect all HTTP to HTTPS
server {
    listen 80;
    server_name localhost;
    return 301 https://$host$request_uri;
}

# HTTPS
server {
    listen 443 ssl;
    server_name localhost;

    ssl_certificate     /etc/nginx/certs/golive.crt;
    ssl_certificate_key /etc/nginx/certs/golive.key;

    access_log /var/log/nginx/golive_access.log golive;   # ← uses the 'golive' format

    root /var/www/golive;
    index index.html;

    location / {
        try_files $uri $uri/ =404;
    }
}
EOF

sudo nginx -t && sudo systemctl reload nginx

curl -k https://localhost >/dev/null            # generate a request
curl -k https://localhost/nope >/dev/null       # generate a 404
sudo tail -n 5 /var/log/nginx/golive_access.log
Each line now shows the client IP, the exact request, the status code, bytes sent, and how long Nginx took — the fields you'll grep during an incident.
Step 5 — Reverse-proxy a Python API
Real sites serve a running app, not just files. Write a tiny Python API that reports which port answered, then have Nginx forward to it:
cat > /tmp/api.py << 'EOF'
from http.server import BaseHTTPRequestHandler, HTTPServer
import json, sys

port = int(sys.argv[1]) if len(sys.argv) > 1 else 3000

class Handler(BaseHTTPRequestHandler):
    def do_GET(self):
        self.send_response(200)
        self.send_header("Content-Type", "application/json")
        self.end_headers()
        self.wfile.write(json.dumps({"message": "hello from the API", "port": port}).encode())
    def log_message(self, *a): pass   # keep the terminal quiet

HTTPServer(("127.0.0.1", port), Handler).serve_forever()
EOF

python3 /tmp/api.py 3000 &            # start the app on :3000
BACKEND=$!
Swap the HTTPS location / from serving files to proxying the app:
sudo tee /etc/nginx/sites-available/golive << 'EOF'
server {
    listen 80;
    server_name localhost;
    return 301 https://$host$request_uri;
}

server {
    listen 443 ssl;
    server_name localhost;

    ssl_certificate     /etc/nginx/certs/golive.crt;
    ssl_certificate_key /etc/nginx/certs/golive.key;

    access_log /var/log/nginx/golive_access.log golive;

    location / {
        proxy_pass http://127.0.0.1:3000;
        proxy_set_header Host $host;
        proxy_set_header X-Real-IP $remote_addr;
        proxy_set_header X-Forwarded-For $proxy_add_x_forwarded_for;
    }
}
EOF

sudo nginx -t && sudo systemctl reload nginx
curl -k https://localhost             # JSON from the API, THROUGH Nginx over HTTPS
kill $BACKEND
Those proxy_set_header lines pass the real client info to the backend — without them the app thinks every request came from Nginx itself.
Step 6 — Load-balance across backends
Run three copies of the API, then define an upstream pool and watch Nginx rotate between them:
for p in 3001 3002 3003; do python3 /tmp/api.py "$p" & done

sudo tee /etc/nginx/sites-available/golive << 'EOF'
upstream app_pool {
    server 127.0.0.1:3001;
    server 127.0.0.1:3002;
    server 127.0.0.1:3003;
}

server {
    listen 80;
    server_name localhost;
    return 301 https://$host$request_uri;
}

server {
    listen 443 ssl;
    server_name localhost;

    ssl_certificate     /etc/nginx/certs/golive.crt;
    ssl_certificate_key /etc/nginx/certs/golive.key;

    access_log /var/log/nginx/golive_access.log golive;

    location / {
        proxy_pass http://app_pool;
        proxy_set_header Host $host;
    }
}
EOF

sudo nginx -t && sudo systemctl reload nginx

# Hit it several times — watch the "port" in the JSON change round-robin
for i in $(seq 6); do curl -sk https://localhost; echo; done
Replies fan out across 3001 → 3002 → 3003 → 3001 …. Kill one backend and Nginx routes around it — that's zero-downtime resilience in a few lines.
Advanced Topics
- Real certificates with Let's Encrypt —
certbot --nginxissues and auto-renews a trusted cert; needs a public domain + port 80. You'll run this for real on your Go-Live server in Week 4 → certbot.eff.org - Load-balancing strategies —
least_conn,ip_hash, weights, and health checks → Nginx — HTTP load balancing - HTTP hardening — HSTS, gzip/brotli, caching headers, HTTP/2 → Mozilla SSL Config Generator
- Location matching — exact, prefix, and regex
locationrules and their precedence → DigitalOcean — Nginx location blocks - Apache, the other server — you'll meet it in the wild; the same ideas,
<VirtualHost>syntax → Apache docs
Assignment
-
Name-based virtual hosts. Configure Nginx to serve two different sites on port 80 from the same VM, chosen by hostname —
site-a.localandsite-b.local— each with its ownrootand a distinctindex.html. Add both names to/etc/hostspointing at127.0.0.1(you did this on Day 2), then prove each returns its own page withcurl -H "Host: site-a.local" http://localhostand the same forsite-b. Paste both configs and both outputs. -
Read the story in the logs. With your proxied site running, make a successful request, a request to a path that doesn't exist, and (bonus) stop your backend and hit the proxy. Then from
/var/log/nginx/golive_access.log(anderror.log) find the log lines and report: the status code for each case (expect a 200, a 404, and a 502), and one sentence on what a 502 Bad Gateway tells you about where the problem is.
Further Reading
- Nginx beginner's guide
- Cloudflare — What is a reverse proxy?
- Cloudflare — How does TLS work?
- What happens when you type a URL — the whole networking week, end to end
- 📺 NGINX Explained in 100 Seconds (Fireship) — the fastest possible intro
- 📺 NGINX for Beginners — full tutorial (KodeKloud, ~1h25) — architecture, config, server blocks, install, even UFW
- 📺 SSL, TLS, HTTPS Explained (ByteByteGo, ~6 min) — the handshake, animated
man nginx,man openssl