Day 6 · Terraform I — IaC, HCL & the Core Workflow
For three days you built AWS resources by hand — clicking consoles, copying IDs, and tearing down with a checklist you could forget. It worked, but it isn't reproducible: nobody can recreate your exact stack. Terraform fixes that. You declare the infrastructure you want in code, Terraform makes reality match, and
terraform destroyremoves every last piece. Today you'll learn what Infrastructure as Code is, how Terraform's language and architecture work, then rebuild Day 4's EC2 + security group in code you can apply, share, and destroy with one command.
Still real AWS resources
Terraform creates the same billable resources you made by hand. The upside: terraform destroy is a reliable teardown — no more hunting for stray resources. Always destroy at the end of a lab.
Learning Objectives
- Explain Infrastructure as Code and name common IaC tools
- Describe Terraform, its creator, and how it relates to OpenTofu
- Contrast Terraform vs Ansible and see why they're complementary
- Read HCL and describe Terraform's architecture (CLI, providers, resources, state)
- Use the core building blocks: variables & types, locals, resources, data sources, outputs
- Run the core workflow
init → plan → apply → destroy
Prerequisites
- Day 4 complete: an AWS account, an IAM user, and the AWS CLI configured (Terraform reuses those credentials)
- Ubuntu 24.04 (the lab installs Terraform there)
Theory · ~25 min
1. What is Infrastructure as Code?
Infrastructure as Code (IaC) means defining your servers, networks, and other infrastructure in machine-readable files instead of clicking through a console. Those files live in git — so your infrastructure becomes versioned, reviewable, reproducible, and self-documenting, and tearing it down is one command instead of a checklist.
Common IaC tools:
| Tool | Scope / language |
|---|---|
| Terraform / OpenTofu | Cloud-agnostic provisioning · HCL |
| AWS CloudFormation | AWS-only · JSON/YAML |
| Pulumi | Provisioning in real languages (Python, TS, Go) |
| Azure Bicep / ARM | Azure-only |
| Ansible | Config management (+ some provisioning) · YAML |
2. Terraform & OpenTofu
Terraform was created by HashiCorp (co-founded by Mitchell Hashimoto) and first released in 2014. In 2023 HashiCorp relicensed Terraform from the open-source MPL to the Business Source License (BSL); in response the community forked the last open version into OpenTofu, now stewarded by the Linux Foundation. OpenTofu is a drop-in, open-source alternative — same HCL, same workflow, just tofu instead of terraform. This course uses Terraform; everything here applies to OpenTofu too.
📺 Watch — Terraform in 100 Seconds (Fireship)
What Terraform is and the declarative IaC model, in under two minutes.

3. Terraform vs Ansible
| Terraform | Ansible | |
|---|---|---|
| Model | Declarative (desired state) | Procedural (ordered tasks) |
| Best at | Provisioning infra (VMs, networks, LBs, DNS) | Configuring inside (packages, files, services) |
| State | Tracks state | Stateless |
| Language | HCL | YAML |
| Connects via | Cloud APIs | SSH |
They are complementary, not competitors. Terraform builds the servers; Ansible configures what runs on them. The DevOps loop you've seen all week: provision (Terraform) → configure (Ansible) → verify → destroy.
4. HCL — the Terraform language
Terraform is written in HashiCorp Configuration Language (HCL) — declarative and block-based. A config is a set of blocks:
# block form:  <type> "<label>" ["<name>"] { arguments }
terraform { ... }                         # settings & required providers
provider  "aws" { ... }                   # configure a provider
resource  "aws_instance" "web" { ... }    # something to create
variable  "region" { ... }                # an input
output    "ip" { ... }                    # a value to print
Comments use #; strings interpolate with ${...}; you reference other objects by address (aws_instance.web.id). Inside a block, arguments go on their own lines; commas only appear inside list/map literals.
Why HCL and not JSON or YAML? Terraform can read JSON, but HCL is purpose-built for describing infrastructure:
| HCL | JSON | YAML | |
|---|---|---|---|
| Made for | Config as code | Data interchange | Config / data |
| Comments | ✅ # and // |
❌ none | ✅ # |
| Expressions & functions | ✅ built in (${...}, for, join()) |
❌ static only | ❌ static only |
| References between objects | ✅ aws_instance.web.id |
❌ manual | ❌ manual |
| Human readability | ✅ high | ⚠️ noisy (braces/quotes) | ✅ high |
| Indentation-sensitive | ❌ no | ❌ no | ✅ yes (error-prone) |
| Machine-generated | ⚠️ possible | ✅ easy | ✅ easy |
Takeaway: HCL gives you comments, variables, expressions, and cross-references that plain data formats can't. JSON stays available for machine-generated config; YAML is common elsewhere (Ansible, Kubernetes) but isn't Terraform's language.
📺 Watch — HCL, the Terraform language
A deeper look at HCL blocks, arguments, and expressions.
5. Terraform architecture
| Piece | Role |
|---|---|
| CLI | the terraform binary you run (init, plan, apply…) |
| Provider | a plugin that speaks one platform's API (aws, google, azurerm, …) |
| Resource | one infrastructure object a provider manages (e.g. aws_instance) |
| State | Terraform's record of everything it created |
| Cloud / infra | the real API endpoints the provider calls |
Flow: you write HCL → the CLI loads a provider → the provider calls the cloud API → Terraform records the result in state.
6. Core building blocks
Every Terraform config is built from a handful of block types. Here's each one on its own, with the details you'll actually reach for.
6.1 terraform — settings & required providers
Declares which Terraform version and which providers the config needs. Runs first; terraform init reads it to download the right plugins.
terraform {
  required_version = ">= 1.6"
  required_providers {
    aws = {
      source  = "hashicorp/aws"   # where to download the provider from
      version = "~> 6.0"          # any 6.x, but not 7.0 — a version constraint
    }
  }
}
6.2 provider — configure a platform
Configures an already-required provider — credentials, region, endpoints. One provider block per platform (you can have several, e.g. two AWS regions, using alias).
6.3 variable — inputs to your config
Variables are how you parameterize a config so the same code works for dev, staging, and prod without editing it.
Define a variable with an optional type, default, description, and validation:
variable "instance_type" {
  type        = string
  default     = "t3.micro"        # optional — omit it to force the caller to supply one
  description = "EC2 size for the web host"
}
Reference it anywhere with var.<name>:
Variable types — the type argument accepts:
| Category | Types | Example value |
|---|---|---|
| Primitive | string, number, bool |
"t3.micro", 3, true |
| Collection | list(...), set(...), map(...) |
["a","b"], { env = "dev" } |
| Structural | object({...}), tuple([...]) |
{ name = "web", port = 80 } |
| Any | any |
(skips type checking) |
variable "azs"   { type = list(string) }                       # ["ap-south-1a","ap-south-1b"]
variable "tags"  { type = map(string) }                        # { Team = "sre", Env = "dev" }
variable "sizes" { type = object({ cpu = number, gpu = bool }) }
Ways to set a variable's value — there are several, and when more than one sets the same variable, precedence decides the winner. Terraform reads sources low → high; the highest one that sets a variable wins:
  ▲ HIGHEST — the command line always wins
  │   6.  -var / -var-file on the CLI      terraform apply -var "instance_type=t3.large"
  │   5.  *.auto.tfvars (alphabetical)      prod.auto.tfvars
  │   4.  terraform.tfvars.json             { "instance_type": "t3.small" }
  │   3.  terraform.tfvars                  instance_type = "t3.small"
  │   2.  TF_VAR_<name>  env variable       export TF_VAR_instance_type=t3.large
  │   1.  default in the variable block     default = "t3.micro"
  ▼ LOWEST — the fallback if nothing else sets it
| Precedence | How | Example |
|---|---|---|
| 6 (highest) | -var / -var-file on the CLI |
terraform apply -var "instance_type=t3.large" |
| 5 | *.auto.tfvars (auto-loaded, alphabetical) |
prod.auto.tfvars |
| 4 | terraform.tfvars.json (auto-loaded) |
{ "instance_type": "t3.small" } |
| 3 | terraform.tfvars (auto-loaded) |
instance_type = "t3.small" |
| 2 | TF_VAR_<name> environment variable |
export TF_VAR_instance_type=t3.large |
| 1 (lowest) | default in the variable block |
default = "t3.micro" |
Two surprises people get wrong
- CLI wins, not env vars. A
-varon the command line overrides aTF_VAR_*env variable — env vars are near the bottom, only abovedefault. -var/-var-fileare applied in the order you type them — the last one on the line wins.
If none is provided and there's no default, Terraform prompts you interactively.
Validate input to fail fast with a clear message:
variable "instance_type" {
  type = string
  validation {
    condition     = can(regex("^t3\\.", var.instance_type))
    error_message = "Only t3.* instance types are allowed."
  }
}
6.4 locals — named, computed values
Locals are internal helpers — computed once, reused by name. Unlike variables, they can't be set from outside; they're for DRYing up repeated expressions. Reference with local.<name>.
6.5 data — READ something that already exists
A data source looks up existing infrastructure (an AMI, a VPC, your account ID) without creating it. Reference with data.<type>.<name>.<attr>.
data "aws_ami" "ubuntu" {
  most_recent = true
  owners      = ["099720109477"]
  filter {
    name   = "name"
    values = ["ubuntu/images/hvm-ssd-gp3/ubuntu-noble-24.04-amd64-server-*"]
  }
}
6.6 resource — something to CREATE
The workhorse: each resource block is one object Terraform creates, updates, and destroys. The two strings are <type> and a local <name> you pick. Reference its attributes with <type>.<name>.<attr>.
resource "aws_instance" "web" {
  ami           = data.aws_ami.ubuntu.id   # from the data source above
  instance_type = var.instance_type        # from the variable
  tags          = { Name = local.name }    # from the local
}
6.7 output — print a value after apply
Outputs surface useful values (an IP, a URL, a generated password) after apply, and expose them to other configs. Mark secrets sensitive.
How they reference each other — the whole config wires together by address:
var.instance_type ─┐
data.aws_ami.ubuntu.id ─┼─▶ resource "aws_instance" "web" ─▶ output "public_ip"
local.name ────────┘
6.8 Expressions — conditions, functions & loops
Blocks describe what to build; expressions compute the values that go inside them. Three you'll use constantly:
Conditions — a ternary condition ? if_true : if_false, great for per-environment tweaks:
locals {
  is_prod       = var.env == "prod"
  instance_type = local.is_prod ? "t3.large" : "t3.micro"
  instance_count = var.env == "prod" ? 3 : 1
}
Functions — 100+ built-ins for strings, numbers, collections, encoding, and networking. A taste:
upper("web")                       # "WEB"
join("-", ["go", "live"])          # "go-live"
length(var.azs)                    # number of items
lookup(var.tags, "Env", "dev")     # map value with a fallback
cidrsubnet("10.0.0.0/16", 8, 2)    # "10.0.2.0/24"
coalesce("", var.name, "default")  # first non-empty value
Tip: test any function live in
terraform console(Section 9) before wiring it into a resource.
Loops — two kinds. for expressions transform a list or map:
locals {
  names       = ["web", "api", "db"]
  upper_names = [for n in local.names : upper(n)]        # ["WEB","API","DB"]
  name_ports  = { for n in local.names : n => 8080 }     # { web = 8080, ... }
}
…and the count / for_each meta-arguments create many copies of a resource:
# count — N identical-ish copies, indexed 0,1,2… (use count.index)
resource "aws_instance" "web" {
  count         = 3
  instance_type = "t3.micro"
  tags          = { Name = "web-${count.index}" }
}

# for_each — one per map/set key (use each.key / each.value) — preferred when items have names
resource "aws_instance" "svc" {
  for_each      = toset(["api", "worker"])
  instance_type = "t3.micro"
  tags          = { Name = each.key }
}
Rule of thumb: for_each when the items have stable names (adding/removing one won't churn the others); count for a plain number of interchangeable copies.
7. The core workflow
| Command | What it does |
|---|---|
terraform init |
Download providers, prepare the working dir |
terraform fmt / validate |
Format and syntax-check |
terraform plan |
Preview the changes (nothing applied) |
terraform apply |
Make reality match — after you confirm |
terraform destroy |
Delete everything in state |
Always read the plan before approving: + creates, ~ updates, - destroys.
8. Warm-ups - Simple snippets
You don't need AWS to feel how Terraform works. These snippets run with just terraform init && terraform apply — no credentials, nothing billable. Great for a live demo before the real lab. They build up in order: read → generate → write → render.
a. http data source — READ from a URL. Fetch your public IP the Terraform-native way (the lab later does the same with curl). A data source reads; it never creates.
terraform {
  required_providers { http = { source = "hashicorp/http" } }
}
data "http" "myip" {
  url = "https://checkip.amazonaws.com"
}
output "my_ip" {
  value = chomp(data.http.myip.response_body)   # e.g. "203.0.113.7"
}
b. random_password — GENERATE a value. The random provider produces values Terraform then remembers in state. Mark the output sensitive so it isn't printed in the clear.
terraform {
  required_providers { random = { source = "hashicorp/random" } }
}
resource "random_password" "db" {
  length  = 16
  special = true
}
output "db_password" {
  value     = random_password.db.result
  sensitive = true     # hidden in CLI; reveal with `terraform output db_password`
}
c. local_file — WRITE a file. The local provider proves Terraform manages any resource, not just cloud — here your filesystem.
terraform {
  required_providers { local = { source = "hashicorp/local" } }
}
resource "local_file" "hello" {
  filename = "${path.module}/hello.txt"
  content  = "Hello from Terraform at ${timestamp()}\n"
}
Run apply → hello.txt appears. Run destroy → it's deleted. That's the full lifecycle on a file you can open.
d. templatefile() — RENDER a config from a template. Terraform's take on the templating you saw in Ansible: fill placeholders in a .tftpl file, then write the result. Create the template first:
Then render it into a real config file:
terraform {
  required_providers { local = { source = "hashicorp/local" } }
}
resource "local_file" "conf" {
  filename = "${path.module}/app.conf"
  content = templatefile("${path.module}/app.conf.tftpl", {
    name = "golive"
    port = 8080
  })
}
apply writes app.conf with the values substituted in — the same pattern you'll use to render nginx.conf, an .env, or EC2 user-data.
9. terraform console — an interactive playground
terraform console is a REPL for HCL: type an expression, get the result immediately — nothing is created, changed, or destroyed. It's the fastest way to try a function, check a variable, or inspect what's in state before you write it into a resource. Start it in a project directory and type expressions at the > prompt (exit or Ctrl-D to quit):
$ terraform console
> 1 + 2
3
> upper("hello world")
"HELLO WORLD"
> join("-", ["go", "live", "2026"])
"go-live-2026"
> length(["a", "b", "c"])
3
It also sees your config's values — variables, locals, and (after an apply) resource attributes and outputs:
> var.instance_type
"t3.micro"
> local.name
"golive-web"
> [for n in ["web", "api"] : upper(n)]     # test a loop before using it
["WEB", "API"]
Use it constantly
Whenever you're unsure what a function returns or how an expression evaluates, reach for terraform console first — it's a zero-risk scratchpad, no apply required.
Lab · ~50 min
Run on your Ubuntu 24.04 host — Terraform uses your configured AWS CLI credentials.
Step 1 — Install Terraform (Ubuntu 24.04)
wget -O- https://apt.releases.hashicorp.com/gpg | sudo gpg --dearmor -o /usr/share/keyrings/hashicorp-archive-keyring.gpg
echo "deb [signed-by=/usr/share/keyrings/hashicorp-archive-keyring.gpg] https://apt.releases.hashicorp.com $(lsb_release -cs) main" | sudo tee /etc/apt/sources.list.d/hashicorp.list
sudo apt update && sudo apt install -y terraform
terraform -version
Step 2 — A "Hello, World" project
mkdir -p ~/tf-hello && cd ~/tf-hello
cat > main.tf << 'EOF'
output "hello" {
  value = "Hello, World — from Terraform!"
}
EOF
terraform init
terraform apply -auto-approve     # prints the hello output — no cloud yet
Proof the workflow runs. Now let's create something real.
Step 3 — A security group + EC2: write the config, then apply
You already have an EC2 key pair in AWS — confirm its name and that you hold the matching private key locally:
aws ec2 describe-key-pairs --query 'KeyPairs[].KeyName' --output table   # find the name
ls ~/.ssh/                                                               # find your .pem / private key
Terraform will just reference that existing key by name (it won't create one).
3a · Write the config
mkdir -p ~/tf-golive && cd ~/tf-golive

cat > main.tf << 'EOF'
terraform {
  required_providers {
    aws = { source = "hashicorp/aws", version = "~> 6.0" }
  }
}

provider "aws" {
  region = var.region
}

data "aws_ami" "ubuntu" {
  most_recent = true
  owners      = ["099720109477"]
  filter {
    name   = "name"
    values = ["ubuntu/images/hvm-ssd-gp3/ubuntu-noble-24.04-amd64-server-*"]
  }
}

# reference an EC2 key pair that already exists in your account (don't create one)
data "aws_key_pair" "web" {
  key_name = var.key_name
}

resource "aws_security_group" "web" {
  name        = "${local.project}-sg"
  description = "SSH + HTTP"

  ingress {
    from_port   = 22
    to_port     = 22
    protocol    = "tcp"
    cidr_blocks = ["0.0.0.0/0"]   # open to the world — fine for a short-lived lab, not production
  }
  ingress {
    from_port   = 80
    to_port     = 80
    protocol    = "tcp"
    cidr_blocks = ["0.0.0.0/0"]
  }
  egress {
    from_port   = 0
    to_port     = 0
    protocol    = "-1"
    cidr_blocks = ["0.0.0.0/0"]
  }
}

resource "aws_instance" "web" {
  ami                    = data.aws_ami.ubuntu.id
  instance_type          = var.instance_type
  key_name               = data.aws_key_pair.web.key_name   # attach the existing key
  vpc_security_group_ids = [aws_security_group.web.id]
  tags                   = { Name = "${local.project}-web" }
}
EOF

cat > variables.tf << 'EOF'
variable "region" {
  type    = string
  default = "us-east-1"
}
variable "instance_type" {
  type    = string
  default = "t3.micro"
}
variable "key_name" {
  type        = string
  description = "Name of an existing EC2 key pair to attach"
}
variable "private_key_path" {
  type        = string
  description = "Local path to that key pair's private key"
  default     = "~/.ssh/id_ed25519"
}
locals {
  project = "golive"
}
EOF

cat > outputs.tf << 'EOF'
output "public_ip" {
  value = aws_instance.web.public_ip
}
output "ssh_command" {
  value = "ssh -i ${var.private_key_path} ubuntu@${aws_instance.web.public_ip}"
}
EOF
3b · Run the core workflow
terraform init                 # downloads the AWS provider
terraform fmt && terraform validate

# pass the name of your existing key pair (replace my-key with yours)
terraform plan  -var "key_name=my-key"
terraform apply -var "key_name=my-key"   # type 'yes'

terraform output public_ip     # your EC2 IP, printed by the output block
Tired of retyping -var?
Drop the values into a terraform.tfvars file — Terraform auto-loads it, so you can run plain terraform apply:
AuthFailure: AWS was not able to validate the provided access credentials
Seeing this even though aws sts get-caller-identity works? On a Vagrant VM the clock drifts (especially after the host sleeps), and AWS rejects requests whose signature timestamp is off by more than a few minutes. Re-sync the clock and re-run:
Step 4 — SSH into the instance
Terraform prints the exact command from the ssh_command output. Give the instance ~30s to boot, then run it:
terraform output -raw ssh_command      # e.g. ssh -i ~/.ssh/my-key.pem ubuntu@203.0.113.7
eval "$(terraform output -raw ssh_command)"   # or just copy-paste the line above
The default user for the Ubuntu AMI is ubuntu, and the key is your existing pair's private half. Two common snags:
- Permission denied (publickey) → wrong private key, or its file permissions are too open. Fix with
chmod 400 ~/.ssh/my-key.pem. - Connection times out → the instance is still booting (wait ~30s), or you're connecting to the wrong IP — re-check
terraform output public_ip.
Step 5 — 🔻 Teardown (the easy way)
One command removes the instance and the security group. This is why IaC beats the manual checklist.
Advanced Topics
Adjacent to today — read the linked resource for each:
terraform.tfvars— drop variables in this file and Terraform auto-loads them (no-varflags) → Terraform — Variable definition files- Explicit dependencies (
depends_on) — force ordering Terraform can't infer from references → Terraform — depends_on terraform import— bring an existing hand-made resource under Terraform's management → Terraform — Import- Provisioners — run scripts on a resource after creation; a last resort (prefer user-data or Ansible) → Terraform — Provisioners
Assignment
Rebuild Day 5's manual stack — entirely in Terraform.
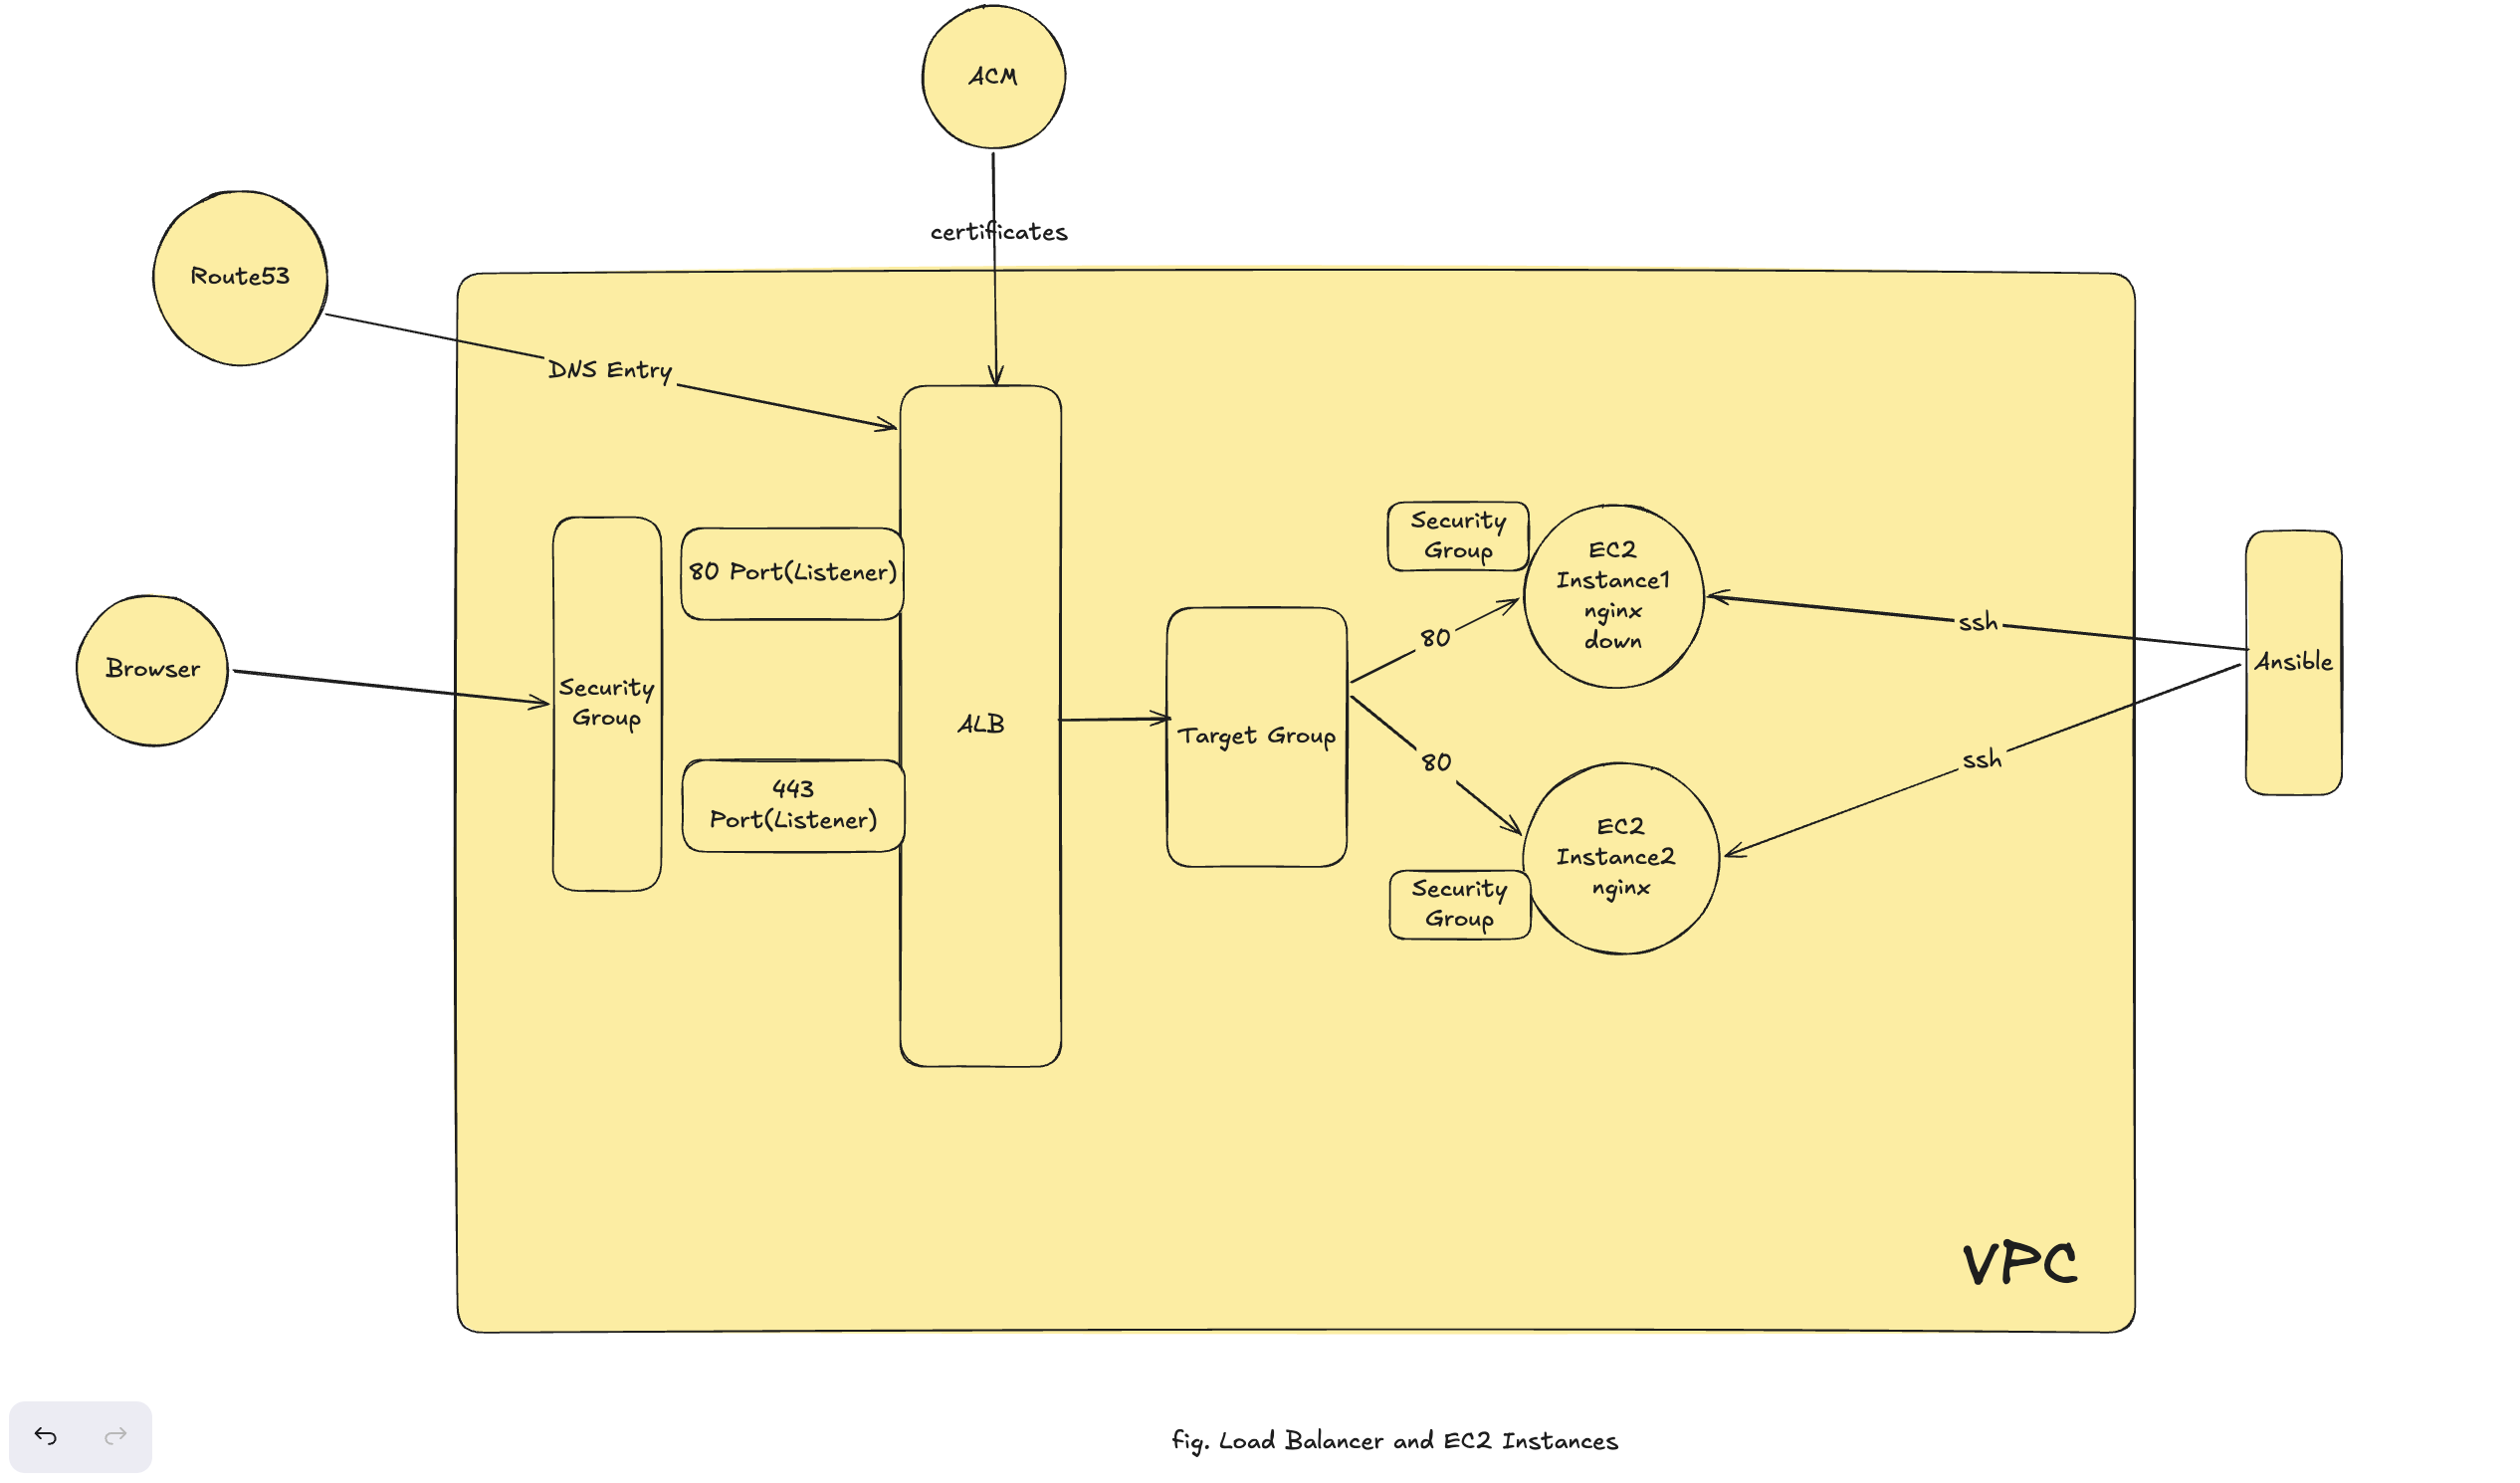
On the last day of AWS you stood up a real, HTTPS web tier by hand: a subdomain in Route 53, an ACM certificate, two EC2 web servers behind an Application Load Balancer, all configured with Ansible. It worked — but none of it is reproducible. Now declare that same architecture in Terraform so it stands up, and tears down, with one command. Everything you built by clicking, you now write as code.
This is spec-driven, like the Day 5 lab — the what is below; you write the how from today's building blocks (data, resource, variable, count/for_each, output) plus a few new AWS resource types you'll look up as you go.
This builds PAID resources — destroy when done
An ALB runs ~$0.02–0.03/hour and the Route 53 hosted zone is $0.50/month. Do the assignment in one sitting and finish with terraform destroy.
What to build
Reproduce the diagram, all in your account's default VPC, on the Ubuntu 24.04 AMI (reuse the data.aws_ami.ubuntu source from the lab):
| # | Component | Terraform resource(s) | Spec |
|---|---|---|---|
| 1 | Two security groups | aws_security_group ×2 |
ALB SG: allow 80 + 443 from 0.0.0.0/0. Web SG: allow 80 from the ALB SG only, and 22 from your IP (so Ansible can SSH). Both egress all. |
| 2 | Two EC2 web servers | aws_instance (count = 2) |
Ubuntu 24.04, t3.micro, across two AZs/subnets, public IP, the web SG, and your existing golive key pair attached (data.aws_key_pair) so Ansible can reach them. Leave them bare — Ansible configures nginx. |
| 3 | ACM certificate (reuse) | data.aws_acm_certificate |
Don't create one — issuing + DNS-validating a cert in Terraform is fiddly. Look up the existing certificate for web.example.com (the one you issued on the last AWS day) with a data source, and attach it to the :443 listener. |
| 4 | Application Load Balancer | aws_lb · aws_lb_target_group · aws_lb_target_group_attachment |
Internet-facing, across both AZs, the ALB SG. Target group HTTP :80, health check /; register both instances. |
| 5 | Listeners | aws_lb_listener ×2 |
:443 HTTPS using the ACM cert, forwarding to the target group; :80 forwarding to the target group (or redirecting to :443). |
| 6 | Route 53 record | aws_route53_record (+ data.aws_route53_zone) |
An A / alias record web.example.com → the ALB. |
| 7 | Outputs | output |
The ALB DNS name and both instance public IPs (you'll feed the IPs to Ansible). |
Then configure with Ansible
Terraform provisions; Ansible configures. Using the instance IPs from your Terraform outputs, run your Ansible playbook from the Ansible days to install and run nginx serving site.zip on port 80 — the same pattern as the Day 2 assignment; site.zip is the one from Week 3 · Day 1 (https://github.com/user-attachments/files/30199374/site.zip). Once the target group's health checks pass, traffic flows.
Done when: https://web.example.com loads with a valid padlock, served through the ALB by nginx on both instances — every piece built by terraform apply, and removed by terraform destroy. This is the full DevOps loop end to end: provision (Terraform) → configure (Ansible) → verify → destroy.
Hints
- Every new resource type here has a copy-pasteable example in the AWS provider docs — search the resource name.
- Find existing infra with data sources:
data.aws_vpc.default,data.aws_subnets.default,data.aws_route53_zone,data.aws_key_pair, anddata.aws_acm_certificatefor the cert. - Reuse the ACM certificate you already have — look it up by domain with
data.aws_acm_certificate(filter for anISSUEDcert) and pass its.arnto the :443 listener. No need to create or DNS-validate a cert in Terraform. - Reference the ALB SG from the web SG's ingress (
security_groups = [aws_security_group.alb.id]) instead of a CIDR — that's how you say "only the load balancer may reach port 80." - The Route 53 record is an
aliasblock (not a plain A record) — point it ataws_lb.web.dns_name/aws_lb.web.zone_id.
Submit
- Your
.tffiles and theterraform applyplan summary (the+resource count). - The live URL while it's up, plus a screenshot showing the padlock + your site.
curl -s https://web.example.comrun a few times, showing it reaches both instances.- Proof of a clean
terraform destroy.
Further Reading
Watch
- 📺 Terraform in 100 Seconds (Fireship) — the fastest intro
- 📺 Terraform explained in 10 mins — a chaptered walkthrough of the core workflow
Reference
- Terraform — Get Started (AWS)
- Terraform — HCL language · Resources · Data sources
- OpenTofu — the open-source fork of Terraform
- AWS provider registry