Day 7 · Terraform II — State, Backends & Modules
Day 6 built one instance in a flat config with local state. That's fine solo, but real teams need three more things: state that lives somewhere safe and shared, a set of habits for treating that state as the precious, sensitive thing it is, and a way to package infrastructure into reusable units instead of copy-pasting HCL between projects. Today you'll go deeper on state, move it to a modern S3 backend (no DynamoDB anymore), learn the best practices for managing it — then build your own reusable module and use it to stand up a whole VPC in one block.
This builds real resources — destroy when done
Today's lab creates a VPC + EC2 (may be free-tier) and some S3 buckets. Run terraform destroy at the end of each example so nothing lingers or bills.
Learning Objectives
- Understand the state file in depth — what it holds, drift, and why it's sensitive
- Apply the best practices for managing Terraform state safely
- Store state in a modern remote S3 backend with native locking (
use_lockfile) — no DynamoDB - Explain what modules are, how they're structured, and how to source & version them
- Use loops (
count,for_each) and conditions to create resources without copy-paste - Lab: loop S3 buckets, then build a simple VPC + EC2 module and deploy it as dev & prod from
.tfvars
Prerequisites
- Day 6 complete (Terraform installed, core workflow understood)
- Terraform ≥ 1.10 (native S3 locking requires it —
terraform -version) - AWS CLI configured
Theory · ~30 min
1. State & the state file (deeper)
Terraform records everything it created in a state file (terraform.tfstate) — a JSON map from each resource address (aws_instance.web) to its real-world ID and attributes. On every plan, Terraform diffs your code ↔ state ↔ reality and does the minimum to reconcile.
Two things to internalize:
- Drift — when reality changes outside Terraform (someone edits a rule in the console), state no longer matches.
terraform plandetects it and proposes to put it back. - State is sensitive — it can contain secrets (passwords, keys, tokens) in plain text. Never commit it to git, never hand-edit it; use the
terraform statesubcommands.
Local state is fine solo, but a shared file on one laptop is a disaster for a team — which is why you move it to a backend.
📺 Watch — Learn Terraform State in 10 Minutes
A tightly chaptered tour of state and remote backends — today's core topic.

Chapters: local state · remote state · backend configuration · local → remote migration
2. Best practices for managing state
State is the one thing Terraform can't rebuild for you — lose it or corrupt it and Terraform forgets what it owns. Treat it accordingly:
| # | Practice | Why |
|---|---|---|
| 1 | Never commit state to git — add *.tfstate* to .gitignore |
It holds secrets in plain text and would cause merge conflicts |
| 2 | Use a remote backend (S3) instead of local files | Durable, shared, survives a lost laptop |
| 3 | Enable locking (use_lockfile = true) |
Stops two applys running at once and corrupting state |
| 4 | Encrypt at rest (encrypt = true + bucket SSE) |
State contains secrets — never store it unencrypted |
| 5 | Enable bucket versioning | Roll back to a previous state if one gets corrupted or deleted |
| 6 | Lock the bucket down — Block Public Access + least-privilege IAM | State is a keys-to-the-kingdom target |
| 7 | Never hand-edit terraform.tfstate — use terraform state mv/rm/show/list and terraform import |
Manual edits silently corrupt it |
| 8 | Isolate state per environment/component (separate keys or buckets, or workspaces) | Limits blast radius — a dev mistake can't touch prod |
| 9 | Keep state small — split big monoliths; share outputs via terraform_remote_state |
Faster plans, smaller blast radius |
| 10 | Pin Terraform & provider versions (required_version, ~>) |
Keeps the state format consistent across the team |
| 11 | Always plan before apply and review drift |
Catch surprises before they hit reality |
The two cardinal rules
Never commit state to git, and never hand-edit it. Almost every state horror story starts by breaking one of these.
3. Remote backend — S3 (the modern way)
A backend stores state centrally so a whole team shares one source of truth; a lock prevents two applys from clashing. Setting one up is two steps: (1) create the bucket that will hold the state, then (2) point your config's backend at it.
3a. First, create the state bucket
The bucket must exist before init (chicken-and-egg — you create it once, then init migrates state into it). You could do that with the CLI (aws s3 mb ...) — but better to use a tiny bootstrap Terraform config that also turns on the versioning, encryption, and public-access block the best-practices table calls for. Put this in its own folder (bootstrap/main.tf), run it once with local state (it has no backend block), and don't touch it again:
# bootstrap/main.tf — creates the S3 bucket that every other config uses as a backend.
# Run once with local state: terraform init && terraform apply
terraform {
  required_providers {
    aws = { source = "hashicorp/aws", version = "~> 6.0" }
  }
}

provider "aws" {
  region = "us-east-1"
}

resource "aws_s3_bucket" "state" {
  bucket = "golive-tf-state-<you>" # must be globally unique
}

# Versioning — recover a previous state if one gets corrupted or deleted
resource "aws_s3_bucket_versioning" "state" {
  bucket = aws_s3_bucket.state.id
  versioning_configuration {
    status = "Enabled"
  }
}

# Encrypt state at rest (it can contain secrets in plain text)
resource "aws_s3_bucket_server_side_encryption_configuration" "state" {
  bucket = aws_s3_bucket.state.id
  rule {
    apply_server_side_encryption_by_default {
      sse_algorithm = "AES256"
    }
  }
}

# State is a keys-to-the-kingdom target — never allow public access
resource "aws_s3_bucket_public_access_block" "state" {
  bucket                  = aws_s3_bucket.state.id
  block_public_acls       = true
  block_public_policy     = true
  ignore_public_acls      = true
  restrict_public_buckets = true
}
Why the bootstrap config keeps local state
The bucket that stores everyone's remote state can't store its own — it doesn't exist yet. So this one small config stays on local state on purpose. It creates one bucket and rarely changes, so that's fine.
3b. Then point your config at it
With the bucket in place, add a backend "s3" block to any other config and run terraform init — it migrates that config's state into the bucket:
terraform {
  backend "s3" {
    bucket       = "golive-tf-state-<you>"   # the bucket you just created
    key          = "vpc/terraform.tfstate"
    region       = "us-east-1"
    encrypt      = true
    use_lockfile = true         # native S3 state locking (Terraform 1.10+)
  }
}
What changed — DynamoDB is no longer needed
For years, S3 state locking required a separate DynamoDB table (dynamodb_table = "...") to hold the lock. Since Terraform 1.10, use_lockfile = true keeps the lock as a small object in the same S3 bucket — so you can delete the DynamoDB table from old configs. One less resource to create, pay for, and manage. This course uses use_lockfile everywhere.
4. Modules — package & reuse infrastructure
A module is just a folder of .tf files with inputs (variable) and outputs (output). Modules are how you stop copy-pasting the same resources and instead write them once, then reuse them — the same idea as an Ansible role.
Why modules:
- DRY — define a web server (or VPC, or database) once, call it many times
- Consistency — every environment gets the same, reviewed building block
- Encapsulation — callers pass a few inputs; the messy internals stay hidden
- Versioning — pin a module to
v1.2.0and upgrade deliberately
4.1 Root module vs child module
The root module isn't special syntax — it's simply the directory where you run terraform apply (the .tf files there). It's the entry point Terraform starts from. When the root module calls another folder with a module block, that folder is a child module. A child module can itself call more modules, so a project forms a tree with your root module at the top:
project-one/  ← ROOT module (you run terraform here)
   └── module "web"  ── calls ──▶  modules/webserver/  ← CHILD module
Every config you wrote on Day 6 was already a root module — it just never called a child one.
4.2 Where a module lives — the source argument
A module block always has a source telling Terraform where to find it — local today, remote later:
| Source | Example | Use |
|---|---|---|
| Local path | ../modules/webserver |
Modules in the same repo |
| Terraform Registry | terraform-aws-modules/vpc/aws |
Community/published modules |
| Git | git::https://github.com/org/repo//modules/vpc?ref=v1.2.0 |
Private/shared modules, pinned to a tag |
Pin remote modules to a version
Registry modules take a version = "~> 6.0" argument; Git modules take a ?ref=v1.2.0. Always pin — an unpinned module can change under you and break the next apply.
The next three subsections walk the two ways you'll use source: write your own local module (4.3) and reuse it (4.4), then pull one from the registry (4.5).
4.3 Build a local module — a webserver (EC2 + security group)
Let's build a tiny webserver module — one EC2 instance plus its security group — then reuse it from two separate projects. Everything is driven by variables, which is what makes it reusable. Here's the layout:
terraform/
├── modules/
│   └── webserver/          # reusable CHILD module: EC2 + security group
│       ├── main.tf
│       ├── variables.tf
│       ├── outputs.tf
│       └── versions.tf     # required_providers (see note below)
├── project-one/            # a ROOT module that reuses webserver
│   └── main.tf
└── project-two/            # another ROOT module that reuses the SAME module
    └── main.tf
A module is conventionally split into four files by role — here's each one:
| File | Holds |
|---|---|
variables.tf |
the inputs the caller passes in |
main.tf |
the resources |
outputs.tf |
values the caller can read back |
versions.tf |
the required_providers the module needs |
modules/webserver/variables.tf — the inputs the module accepts:
variable "name" {
  type        = string
  description = "Name for the instance and its security group."
}
variable "ami_id" {
  type        = string
  description = "AMI to launch."
}
variable "instance_type" {
  type    = string
  default = "t3.micro"
}
variable "allowed_ssh_cidrs" {
  type    = list(string)
  default = ["0.0.0.0/0"]
}
modules/webserver/main.tf — the resources, all parameterized by those variables:
resource "aws_security_group" "this" {
  name        = "${var.name}-sg"
  description = "SSH + HTTP for ${var.name}"

  ingress {
    description = "SSH"
    from_port   = 22
    to_port     = 22
    protocol    = "tcp"
    cidr_blocks = var.allowed_ssh_cidrs
  }
  ingress {
    description = "HTTP"
    from_port   = 80
    to_port     = 80
    protocol    = "tcp"
    cidr_blocks = ["0.0.0.0/0"]
  }
  egress {
    from_port   = 0
    to_port     = 0
    protocol    = "-1"
    cidr_blocks = ["0.0.0.0/0"]
  }

  tags = { Name = "${var.name}-sg" }
}

resource "aws_instance" "this" {
  ami                    = var.ami_id
  instance_type          = var.instance_type
  vpc_security_group_ids = [aws_security_group.this.id]

  tags = { Name = var.name }
}
modules/webserver/outputs.tf — what callers can read back:
output "public_ip" {
  value = aws_instance.this.public_ip
}
output "security_group_id" {
  value = aws_security_group.this.id
}
modules/webserver/versions.tf — declares which providers the module needs:
terraform {
  required_version = ">= 1.6"
  required_providers {
    aws = {
      source  = "hashicorp/aws"
      version = "~> 6.0"
    }
  }
}
Does a child module need a terraform block?
No — it's optional, but recommended. A child module inherits the provider (and its configuration) from the root module that calls it, so webserver works even with no terraform block — project-one configures provider "aws" and the module just uses it. But a reusable module should declare required_providers (conventionally in versions.tf) to state which providers it needs and, crucially, their source addresses — this matters for correct resolution (especially non-HashiCorp providers) and documents version compatibility. What a child module must not contain is a provider "aws" {} configuration block or a backend block — those belong only in the root module.
4.4 Reuse it across two projects
Each project is its own root module with its own state; both call the same webserver module but pass different inputs. project-one/main.tf — a small, wide-open dev box:
terraform {
  required_providers {
    aws = { source = "hashicorp/aws", version = "~> 6.0" }
  }
}

provider "aws" {
  region = "us-east-1"
}

data "aws_ami" "ubuntu" {
  most_recent = true
  owners      = ["099720109477"]
  filter {
    name   = "name"
    values = ["ubuntu/images/hvm-ssd-gp3/ubuntu-noble-24.04-amd64-server-*"]
  }
}

module "web" {
  source = "../modules/webserver"   # local path to the child module

  name          = "project-one-web"
  ami_id        = data.aws_ami.ubuntu.id
  instance_type = "t3.micro"
}

# read a child module's output with module.<name>.<output>
output "web_ip" {
  value = module.web.public_ip
}
project-two/main.tf — the same module, but a bigger instance and SSH locked to one IP. Only the module block differs (provider + data source are identical):
module "web" {
  source = "../modules/webserver"

  name              = "project-two-web"
  ami_id            = data.aws_ami.ubuntu.id
  instance_type     = "t3.small"              # different size
  allowed_ssh_cidrs = ["203.0.113.10/32"]     # locked to one IP
}
Run terraform init && terraform apply inside project-one/, then again inside project-two/, and you get two independent web servers from one shared definition. Fix a bug in modules/webserver/ once and both projects pick it up on their next apply. That's the whole payoff of modules.
Each root module has its own state
project-one and project-two keep separate state files, so applying or destroying one never touches the other — exactly the isolation the best-practices table recommends.
The full, runnable version of this example is in the repo at examples/terraform (modules/webserver, project-one, project-two).
4.5 Use a module from the registry
You don't always have to write the module. The Terraform Registry hosts thousands of published, community-maintained modules — the most popular being terraform-aws-modules/vpc/aws. A registry module is used exactly like a local one, except source is a registry address and you add a version:
provider "aws" {
  region = "us-east-1"
}

data "aws_availability_zones" "available" {
  state = "available"
}

module "vpc" {
  source  = "terraform-aws-modules/vpc/aws"
  version = "~> 6.0"   # pin it — allows any 6.x

  name = "golive-vpc"
  cidr = "10.0.0.0/16"

  azs             = slice(data.aws_availability_zones.available.names, 0, 2)
  public_subnets  = ["10.0.0.0/24", "10.0.1.0/24"]   # 2 public subnets
  private_subnets = ["10.0.10.0/24", "10.0.11.0/24"] # 2 private subnets

  enable_nat_gateway = true   # create NAT gateway(s) for private-subnet egress
  single_nat_gateway = true   # just ONE, shared across AZs (cheaper than one per AZ)

  tags = {
    Project   = "golive"
    ManagedBy = "terraform"
  }
}

output "vpc_id"          { value = module.vpc.vpc_id }
output "public_subnets"  { value = module.vpc.public_subnets }
output "private_subnets" { value = module.vpc.private_subnets }
That ~20-line block builds a complete VPC: the VPC, an internet gateway (created automatically because there are public subnets), 2 public + 2 private subnets across two AZs, route tables, and 1 NAT gateway (single_nat_gateway = true) giving the private subnets outbound internet. Run it the same way — terraform init downloads the module from the registry, then plan / apply.
This example is billable — a NAT gateway isn't free
Unlike the lab below, enable_nat_gateway = true here creates a NAT gateway (~$0.045/hour + data) plus an Elastic IP. single_nat_gateway = true keeps it to one instead of one per AZ, but it still costs money — terraform destroy promptly if you try this.
Don't reinvent the VPC
In real projects most teams use the battle-tested terraform-aws-modules/vpc/aws from the registry — which is exactly what Example 2 of today's lab does. Curious what a VPC module looks like under the hood? The repo has a hand-written one at examples/terraform/modules/vpc.
5. Loops & conditions
Two things you'll reach for constantly: loops to stamp out many resources without copy-paste, and conditions to make one config behave differently per environment. Four simple patterns — that's most of what you need.
5.1 count — N copies of a resource
resource "aws_instance" "web" {
  count         = 3                        # make three
  ami           = var.ami_id
  instance_type = "t3.micro"
  tags          = { Name = "web-${count.index}" }   # web-0, web-1, web-2
}
count.index is 0, 1, 2…. Reference one copy by index, or all of them with the [*] splat — an output shows both:
output "first_web_id" {
  value = aws_instance.web[0].id      # one, by index → "i-0abc..."
}
output "all_web_ids" {
  value = aws_instance.web[*].id      # the whole list → ["i-0abc...", "i-1def...", "i-2ghi..."]
}
5.2 for_each — one resource per map entry
Loop over a local map when each item has a name (adding or removing one won't renumber the rest):
locals {
  buckets = {
    logs    = "golive-logs"
    backups = "golive-backups"
  }
}

resource "aws_s3_bucket" "this" {
  for_each = local.buckets    # one bucket per entry
  bucket   = each.value       # each.key = "logs"/"backups", each.value = the name
}
Reference one by its key, or build a map of all of them with a for expression:
output "logs_bucket" {
  value = aws_s3_bucket.this["logs"].id                    # one, by key
}
output "all_buckets" {
  value = { for k, b in aws_s3_bucket.this : k => b.id }   # { logs = "...", backups = "..." }
}
count vs for_each
Use count for N interchangeable copies; for_each when items have stable names — so removing the middle one doesn't shift the others.
5.3 Conditions — pick a value with a ternary
condition ? if_true : if_false — perfect for per-environment differences:
5.4 Conditional creation — count of 0 or 1
Combine the two to toggle a whole resource on or off — e.g. create a NAT gateway (or an Elastic IP) only in prod:
resource "aws_eip" "nat" {
  count  = var.enable_nat ? 1 : 0   # create it only when enabled
  domain = "vpc"
}

# because it may not exist, reference it safely with one() — null when disabled
output "nat_eip" {
  value = one(aws_eip.nat[*].public_ip)
}
Runnable example
Example 1 of today's lab builds S3 buckets with both count and for_each — the runnable version is at examples/terraform/loops. Day 6 · Section 6.8 covers the fuller set (for expressions, more functions).
Lab · ~45 min
Two small, self-contained examples that put today together. Example 1 creates S3 buckets with loops — one set with count, one with a for_each map. Example 2 builds a super-simple module (VPC + one EC2) and runs it as dev and prod from .tfvars. The finished files are in the repo under examples/terraform (loops and multi-env).
Do this first — set up the S3 backend (Section 3)
Both examples keep their state in S3, so before anything else: create the state bucket once (Section 3a), then add the backend "s3" block (Section 3b) shown in each example — give each a unique key so they don't clash (buckets/terraform.tfstate for Example 1, webserver/terraform.tfstate for Example 2). terraform init migrates state into the bucket.
Example 1 — S3 buckets with loops
A dedicated little project showing the two looping styles side by side. Work in a fresh folder:
First add a backend.tf so this project's state lives in S3 (bucket from Section 3a):
terraform {
  backend "s3" {
    bucket       = "golive-tf-state-<you>"
    key          = "buckets/terraform.tfstate"
    region       = "us-east-1"
    encrypt      = true
    use_lockfile = true
  }
}
Then put a provider block in main.tf, and the two bucket resources below.
1a. Numbered buckets with count
count makes N identical buckets, numbered by count.index:
variable "prefix" {
  type    = string
  default = "golive" # bucket names are GLOBAL — change to something unique
}

resource "aws_s3_bucket" "numbered" {
  count  = 3
  bucket = "${var.prefix}-bucket-${count.index}" # -bucket-0, -bucket-1, -bucket-2
}

output "numbered_buckets" {
  value = aws_s3_bucket.numbered[*].id # reference the whole set with the [*] splat
}
1b. Named buckets with for_each + a map
for_each over a map makes one bucket per named entry — better when items have stable names:
variable "buckets" {
  type = map(string)
  default = {
    logs    = "logs"
    backups = "backups"
  }
}

resource "aws_s3_bucket" "named" {
  for_each = var.buckets
  bucket   = "${var.prefix}-${each.value}" # golive-logs, golive-backups
  tags     = { Purpose = each.key }        # each.key = "logs" / "backups"
}

output "named_buckets" {
  value = { for k, b in aws_s3_bucket.named : k => b.id } # reference as a map
}
1c. Deploy
terraform init                                         # initializes the S3 backend
terraform apply -var "prefix=golive-<your-initials>"   # bucket names must be globally unique
terraform output

terraform destroy -var "prefix=golive-<your-initials>"
Example 2 — A reusable module (VPC + EC2)
A tiny module that stands up one VPC (using the registry module from Section 4.5), one security group, and one EC2 — driven by just two variables. You then deploy it as dev and prod by swapping a .tfvars file.
Lay out the folders:
tf-lab/
├── modules/
│   └── webserver/        # the module: VPC (registry) + SG + EC2
│       ├── main.tf
│       ├── variables.tf
│       ├── outputs.tf
│       └── versions.tf
├── main.tf               # root: just calls the module
├── backend.tf            # S3 remote state (see Section 3)
├── variables.tf
├── outputs.tf
├── dev.tfvars
└── prod.tfvars
2a. The module — as simple as it gets
modules/webserver/variables.tf — only two inputs:
modules/webserver/main.tf — the VPC comes from the registry module; you add one SG and one EC2:
data "aws_availability_zones" "available" {
  state = "available"
}

data "aws_ami" "ubuntu" {
  most_recent = true
  owners      = ["099720109477"]
  filter {
    name   = "name"
    values = ["ubuntu/images/hvm-ssd-gp3/ubuntu-noble-24.04-amd64-server-*"]
  }
}

# one VPC — from the community registry module
module "vpc" {
  source  = "terraform-aws-modules/vpc/aws"
  version = "~> 6.0"

  name           = "${var.name}-vpc"
  cidr           = "10.0.0.0/16"
  azs            = slice(data.aws_availability_zones.available.names, 0, 2)
  public_subnets = ["10.0.1.0/24", "10.0.2.0/24"]
}

# one security group
resource "aws_security_group" "web" {
  name   = "${var.name}-web-sg"
  vpc_id = module.vpc.vpc_id
  ingress {
    from_port   = 80
    to_port     = 80
    protocol    = "tcp"
    cidr_blocks = ["0.0.0.0/0"]
  }
  egress {
    from_port   = 0
    to_port     = 0
    protocol    = "-1"
    cidr_blocks = ["0.0.0.0/0"]
  }
}

# one EC2
resource "aws_instance" "web" {
  ami                    = data.aws_ami.ubuntu.id
  instance_type          = var.instance_type
  subnet_id              = module.vpc.public_subnets[0]
  vpc_security_group_ids = [aws_security_group.web.id]
  tags                   = { Name = "${var.name}-web" }
}
modules/webserver/outputs.tf:
output "vpc_id" {
  value = module.vpc.vpc_id
}
output "web_ip" {
  value = aws_instance.web.public_ip
}
modules/webserver/versions.tf:
terraform {
  required_version = ">= 1.6"
  required_providers {
    aws = {
      source  = "hashicorp/aws"
      version = "~> 6.0"
    }
  }
}
2b. The root config + two tfvars files
main.tf — just a provider and one module block:
terraform {
  required_version = ">= 1.6"
  required_providers {
    aws = {
      source  = "hashicorp/aws"
      version = "~> 6.0"
    }
  }
}

provider "aws" {
  region = var.region
}

module "webserver" {
  source        = "./modules/webserver"
  name          = "golive-${var.environment}"
  instance_type = var.instance_type
}
backend.tf — state in S3 (bucket from Section 3a), with its own key:
terraform {
  backend "s3" {
    bucket       = "golive-tf-state-<you>"
    key          = "webserver/terraform.tfstate"
    region       = "us-east-1"
    encrypt      = true
    use_lockfile = true
  }
}
variables.tf:
variable "region" {
  type    = string
  default = "us-east-1"
}
variable "environment" {
  type        = string
  description = "dev or prod — set by the matching .tfvars file"
}
variable "instance_type" {
  type    = string
  default = "t3.micro"
}
outputs.tf:
dev.tfvars and prod.tfvars — the only thing that differs between environments:
2c. Deploy
cd ~/tf-lab
terraform init                        # downloads the AWS provider + the registry VPC module
terraform fmt -recursive && terraform validate

terraform apply -var-file=dev.tfvars  # read the plan, type 'yes'
terraform output web_ip
To deploy the prod variant, it's the same command with the other file: terraform apply -var-file=prod.tfvars. Teardown when done:
Keeping dev and prod at the same time
With one state file, applying prod replaces dev. To run both at once, give each its own state — a separate directory per environment, or a backend key per environment (see Advanced Topics). We keep it to one here to stay focused on modules + tfvars.
Advanced Topics
Adjacent to today — read the linked resource for each:
terraform-aws-modules/vpc— the production-grade VPC module; read its inputs to see how far a module can go → Registry- Workspaces — one config, multiple named states for
dev/staging/prod(an alternative to a directory per environment) → Terraform — Workspaces terraform_remote_state— one stack reads another's outputs (network → app) → remote_state data sourceterraform statesubcommands —mv,rm,import,show,listfor surgically managing state → Terraform — state CLI- CI/CD for Terraform —
planon pull requests,applyon merge (Week 4 territory) → Automate Terraform with CI/CD
Assignment
Build an HTTPS web tier with your own Terraform modules — two web servers behind a load balancer, served at terraform.<your-domain> over HTTPS — then deploy the app with Ansible.
Heads-up: this costs money
An ALB (~$0.02–0.03/hr) and a Route 53 hosted zone ($0.50/mo) are billable — tear it all down when you're done (see Clean up below).
Architecture
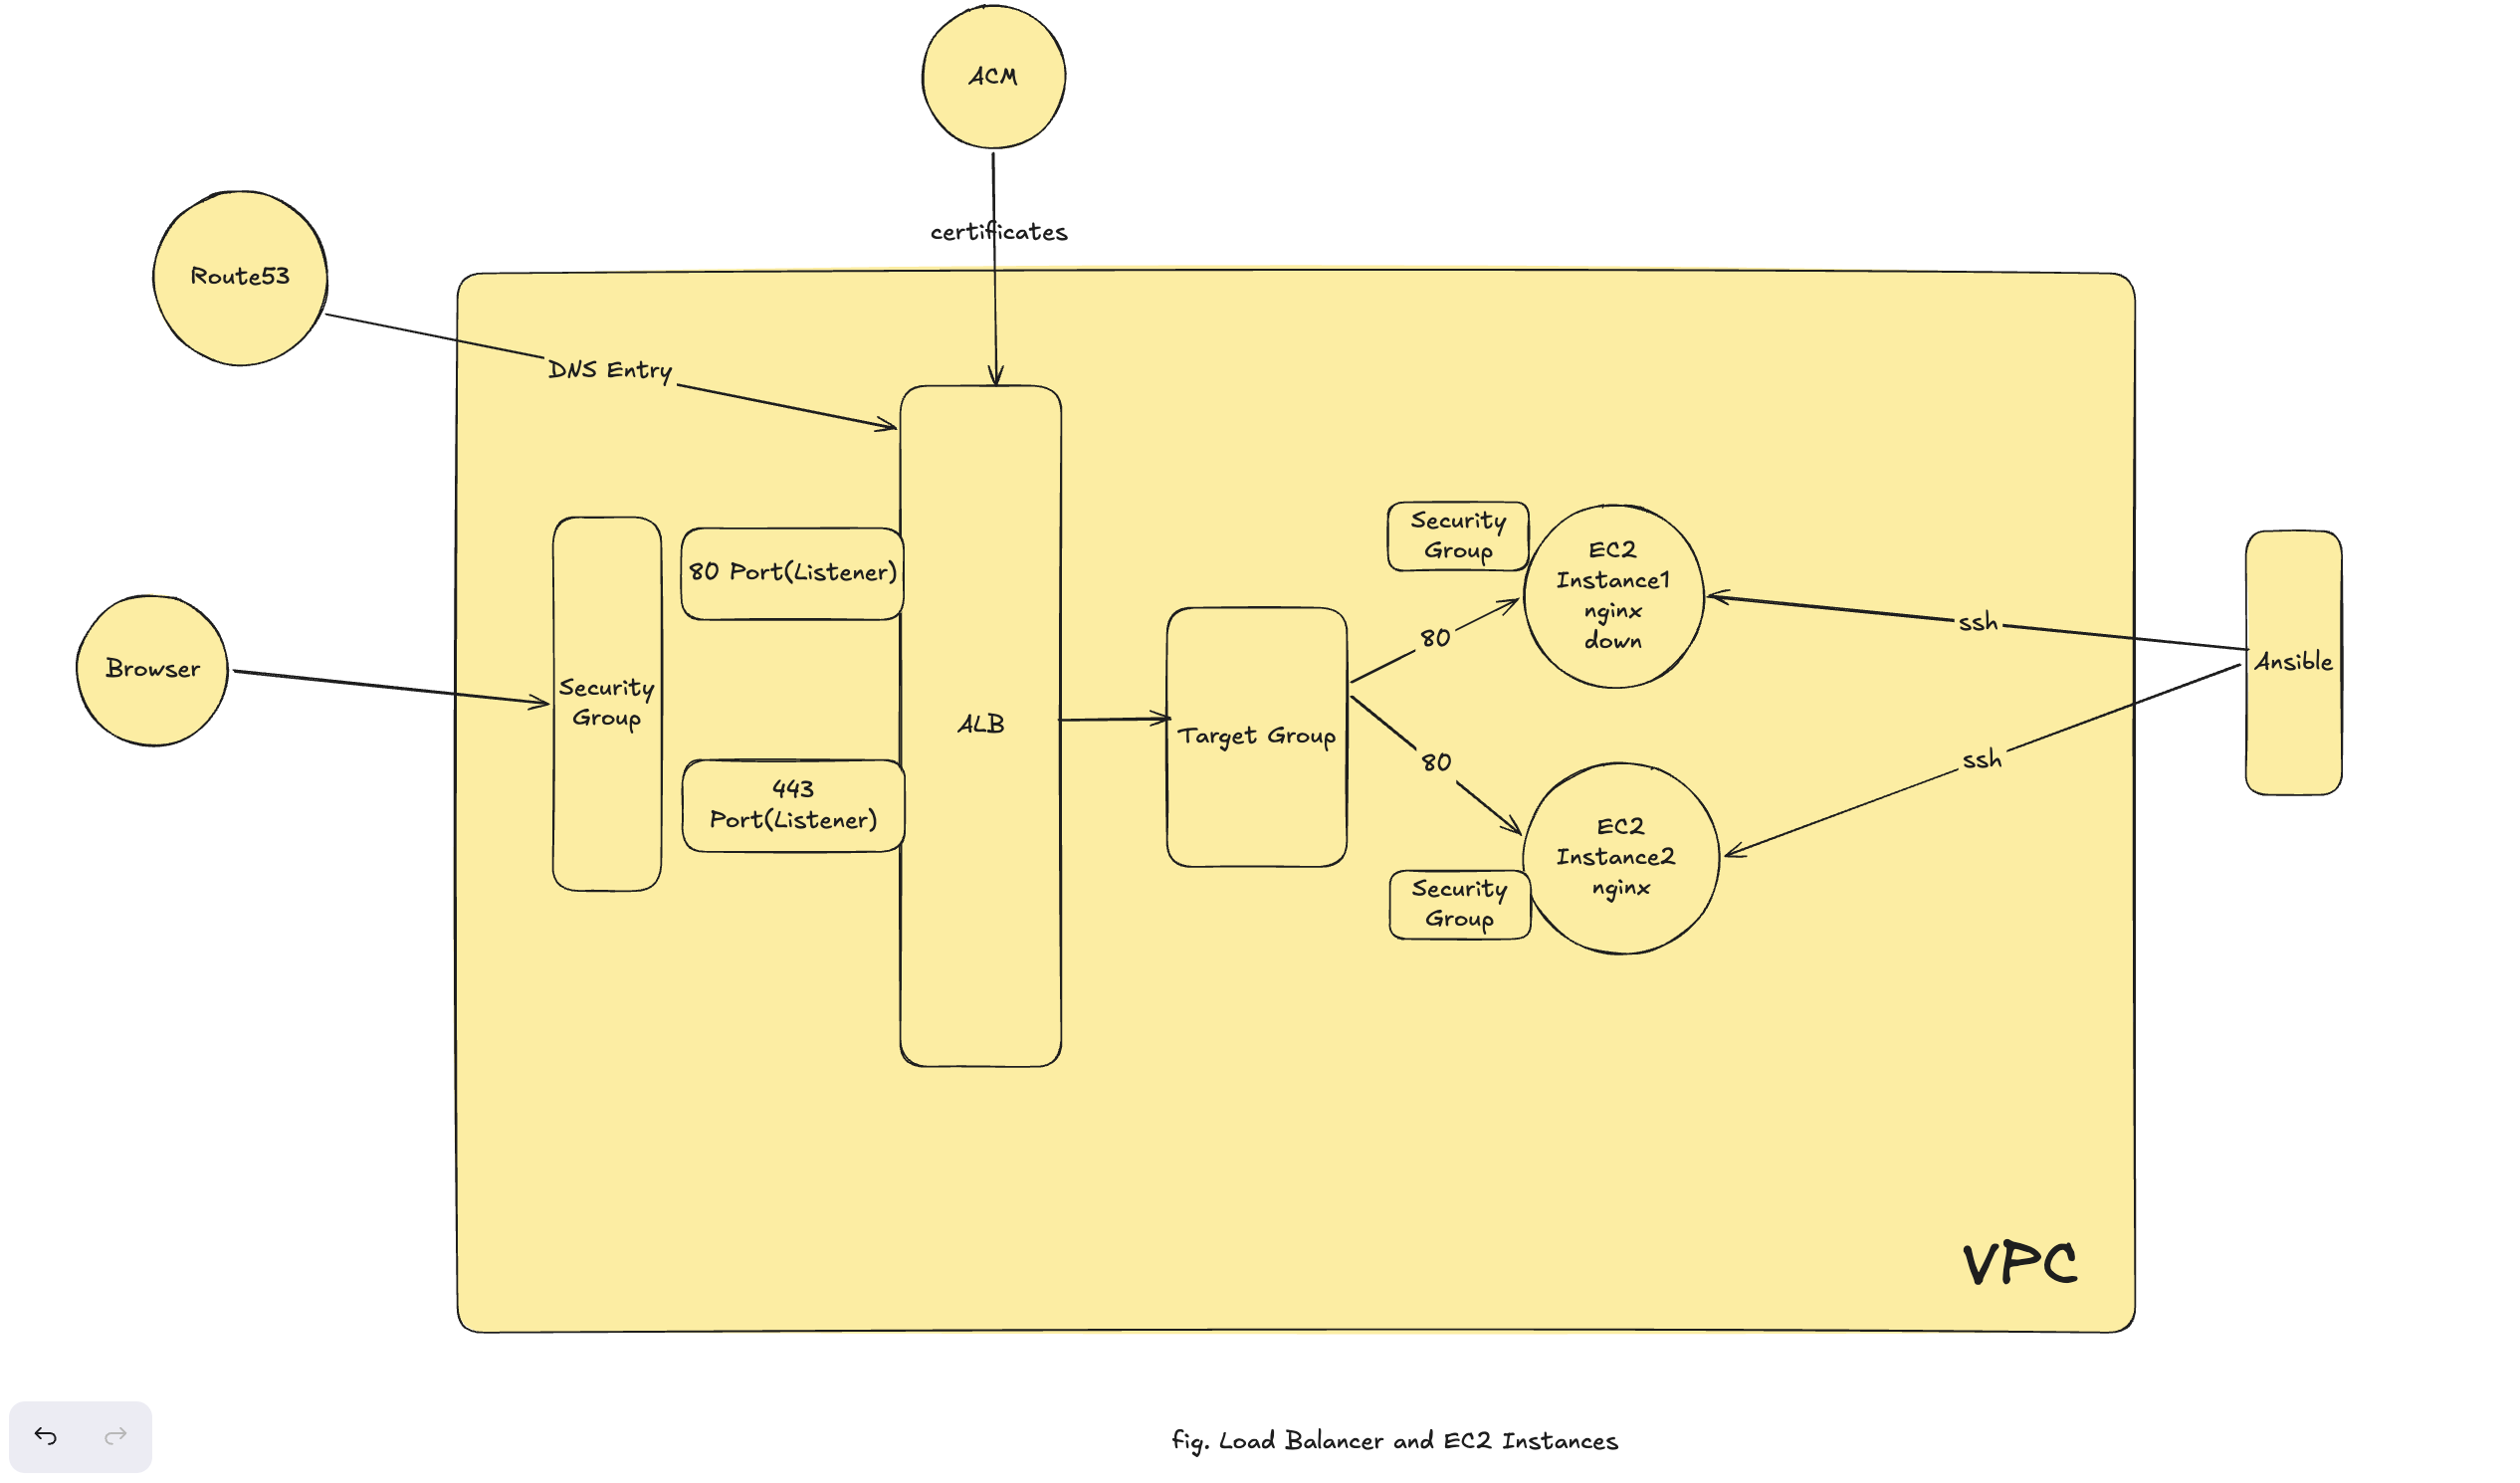
Zoom in / open the image in a new tab if the labels are hard to read.
Infra to create
| # | Infra | Module | Details |
|---|---|---|---|
| 1 | 1 VPC + 2 public subnets | vpc |
10.0.0.0/16, across 2 AZs |
| 2 | 2 EC2 + security group | ec2 |
Ubuntu 24.04, t3.micro, SSH key pair attached; SG allows 22 from your IP, 80 from the ALB |
| 3 | 1 ALB + target group + 2 listeners | alb |
in the public subnets; :443 HTTPS (ACM cert) → TG, :80 → redirect to :443; TG :80 → both EC2 |
| 4 | Hosted zone + ACM cert + DNS record | hostedzone |
zone for <your-domain>; ACM cert for terraform.<your-domain> (DNS-validated); alias terraform.<your-domain> → ALB |
| 5 | Deploy the app | Ansible | install Docker + run an nginx container serving site.zip on :80, both EC2 |
Project layout
terraform-webtier/
├── modules/
│   ├── vpc/          # 1 VPC + 2 public subnets
│   ├── ec2/          # 1 EC2 + security group   (root uses it for 2)
│   ├── alb/          # ALB + target group + listeners (:80, :443) — takes the cert ARN
│   └── hostedzone/   # Route 53 zone + ACM cert (DNS-validated) + alias record
├── dev/              # root env — calls the 4 modules
└── prod/             # root env — same modules, different values
Notes
- Route 53 delegation can be done manually — point your registrar's nameservers at your Route 53 zone's NS records. (The first
applycreates the zone; once DNS propagates, the ACM cert validates.) - Use the S3 backend (Section 3) for remote state.
- Create and deploy the dev infra.
- Create and deploy the prod infra.
- Use Ansible to install Docker and serve
site.zipfrom an nginx container on port 80 — same pattern as the Day 2 assignment. Get it here:site.zip.
Submit: your modules + dev/prod roots, a screenshot showing the padlock + your site, a curl run a few times hitting both instances, and proof of a clean terraform destroy.
Clean up (don't skip)
Destroy both environments when you're done
Further Reading
Watch
- 📺 Learn Terraform State in 10 Minutes — state, remote backends & locking, heavily chaptered
Reference