Day 3 · Terraform in CI/CD — Automating IaC with GitHub Actions
Running
terraform applyfrom your laptop (Week 3) is fine to learn on, but it doesn't scale: whose laptop is the source of truth? Who reviewed the change? What if two people apply at once? Moving Terraform into the pipeline fixes all of that — the samefmt → validate → plan → applyflow, but run by GitHub Actions on a clean machine, reviewed like code, and authenticated to AWS with no stored keys via OIDC. The example is kept deliberately small: one tiny Terraform config, so the focus is the automation, not the infrastructure.
Where this fits
This applies the CI/CD pattern to Terraform. Running Ansible from CI is covered in Ansible in CI/CD, and Deploy a Full-Stack AWS Project combines them to provision and deploy the whole app.
Learning Objectives
- Explain why IaC belongs in a pipeline, not on developer laptops
- Authenticate GitHub Actions to AWS with OIDC — keyless, short-lived credentials
- Run the
fmt → validate → plan → applyflow as a workflow - Post the plan on a pull request and apply on merge
- Lab: a minimal Terraform config applied by GitHub Actions, end to end
Prerequisites
- Week 3 complete — Terraform basics, the S3 remote backend (Day 21)
- An AWS account where you can create an IAM OIDC provider + role
- A new, dedicated GitHub repo for this lab (e.g.
terraform-ci) — this day doesn't reuse the sample-app repo
Theory · ~30 min
1. Why run Terraform in CI
Applying from a laptop has real problems that a pipeline fixes:
| Laptop apply | Pipeline apply |
|---|---|
| Whose state/version is authoritative? | One clean runner, pinned versions — reproducible |
| Changes land unreviewed | Every change is a PR with a visible plan |
| Long-lived AWS keys on many machines | OIDC — short-lived creds, nothing stored |
| Two applies can clash | Serialized runs + state locking (Day 21) |
| "It worked on mine" | Same environment every time |
The goal: nobody runs apply locally. Terraform changes flow through git like any other code.
2. The Terraform pipeline
The same four commands you already know, now as pipeline stages with a review gate in the middle:
  PR opened ──▶ fmt -check ──▶ validate ──▶ plan ──▶ post plan as PR comment
                                                          │  (human reviews)
  merge to main ─────────────────────────────────▶ apply
fmt -checkfails if code isn't formatted — a cheap style gate.validatecatches syntax/type errors before touching AWS.planon the PR shows exactly what will change — reviewed before it's real.applyruns only after merge tomain.
3. OIDC — keyless AWS auth (the proper setup)
📺 Watch — Authenticate GitHub Actions with AWS Using OIDC — No Secrets Needed
A hands-on walkthrough of exactly this setup — the IAM OIDC provider, the role, and its trust policy.
Day 2 introduced OIDC; here's the full picture. You create two things in AWS once:
- An IAM OIDC identity provider trusting
token.actions.githubusercontent.com. - An IAM role whose trust policy allows your repo to assume it, with a permissions policy scoped to what Terraform manages.
The trust policy — note the sub condition pins it to your repo so no other repo can assume the role:
{
  "Effect": "Allow",
  "Principal": { "Federated": "arn:aws:iam::<acct>:oidc-provider/token.actions.githubusercontent.com" },
  "Action": "sts:AssumeRoleWithWebIdentity",
  "Condition": {
    "StringEquals": { "token.actions.githubusercontent.com:aud": "sts.amazonaws.com" },
    "StringLike":  { "token.actions.githubusercontent.com:sub": "repo:<you>/terraform-ci:*" }
  }
}
At run time the workflow presents a signed token, AWS verifies it against the trust policy, and hands back a 15-minute credential. No access keys ever exist to leak.
Scope the sub condition tighter in production
repo:<you>/terraform-ci:* allows any branch/PR. Real setups pin to a branch (...:ref:refs/heads/main) or an environment (...:environment:production) so only trusted contexts can touch AWS.
4. Remote state in CI is mandatory
A GitHub runner is ephemeral — it's destroyed after the job. Local state would vanish with it. So a CI-run config must use a remote backend (the S3 backend from Day 21) — that's where state lives between runs, and where locking prevents two runs clashing.
5. CI hygiene for Terraform
Small flags that matter in automation:
-input=false— never prompt (there's no human at the terminal).-no-color— clean logs/PR comments.-auto-approveon apply — the review already happened on the PR.- Save the plan (
-out=tfplan) and apply that exact plan for true safety (see Advanced Topics).
Lab · ~45 min
Automate a tiny Terraform config with GitHub Actions: plan on PRs, apply on merge, authenticated by OIDC. The infra is intentionally trivial — a single EC2 instance (a t3.micro, free-tier-eligible) — so all your attention is on the pipeline.
Runnable version in the repo
The complete project is at examples/cicd/terraform-ci — copy it into a fresh terraform-ci repo; the steps below walk through what's in it.
Reuse your S3 backend
Use the state bucket from Day 21, Section 3. This config gets its own key: ci-demo/terraform.tfstate.
1. Create the OIDC role
In the AWS console (IAM → Identity providers → Add provider → OpenID Connect):
- Provider URL:
https://token.actions.githubusercontent.com, Audience:sts.amazonaws.com. - Then create a role for web identity using that provider, with the trust policy from Section 3 and a permissions policy allowing EC2 (plus access to your state bucket).
Note the role ARN.
2. The Terraform config
This lab lives in its own repo — create an empty terraform-ci on github.com and clone it (don't reuse the sample-app repo). Copy the terraform/ folder from the reference project — examples/cicd/terraform-ci/terraform/ — into it. It's a single t3.micro EC2 instance wired to the S3 backend; open terraform/main.tf and set the backend bucket to your state bucket (its key is ci-demo/terraform.tfstate).
Commit the lock file
After terraform init, commit the generated .terraform.lock.hcl — it pins the exact provider version so your machine and the CI runner resolve the same AWS provider. Only .terraform/ and *.tfstate belong in .gitignore.
3. The workflow — plan on PR, apply on merge
Copy .github/workflows/terraform.yml from the same reference project — examples/cicd/terraform-ci/.github/workflows/ — to your repo root, then set role-to-assume to the role ARN from step 1. On a PR it runs init → fmt → validate → plan; on merge to main it runs apply.
4. Run the full cycle
- Commit on a branch, open a PR. The workflow runs
fmt/validate/plan— expand the Plan step and read "1 to add." - Merge. The
applystep runs and creates the instance. Confirm it in the EC2 console. - Change the instance's tags on another branch, open a PR — the plan now shows "1 to change." Merge to apply.
You just changed AWS infrastructure without touching a terminal or storing a key — every change reviewed as a PR.
5. Clean up
Add a manual destroy you can trigger from the UI — a workflow_dispatch workflow that runs terraform destroy -auto-approve — or just run it once locally to remove the instance. An EC2 instance bills by the hour, so don't leave it running.
What you just built
A keyless, reviewable Terraform pipeline: PRs show the plan, merges apply it. The same pattern for Ansible is in Ansible in CI/CD; Deploy a Full-Stack AWS Project combines both.
Advanced Topics
- Save & apply the exact plan —
plan -out=tfplanas an artifact,apply tfplanon merge (no drift between plan and apply) → Automate Terraform - Post the plan as a PR comment — render the diff inline with
actions/github-scriptordflook/terraform-plan - Scan the HCL —
tflint/trivy config/checkovas CI gates (tfsec merged into Trivy in 2024) →tflint· Trivy · Checkov — covered on Day 7 · Security Best Practices - Environments for apply — require a reviewer before the apply job runs → Using environments (the Day 2 pattern)
- Matrix over environments — one workflow that plans dev + prod in parallel → Using a matrix
Assignment
Build an HTTPS web tier with your own Terraform modules — two web servers behind a load balancer, served at terraform.<your-domain> over HTTPS — then deploy the app with Ansible. The one change from doing it by hand: the pipeline runs it — open a PR to see the plan, merge to main to apply, all authenticated by OIDC (no stored keys).
Heads-up: this costs money
An ALB (~$0.02–0.03/hr) and a Route 53 hosted zone ($0.50/mo) are billable — tear it all down when you're done (see Clean up below).
Architecture
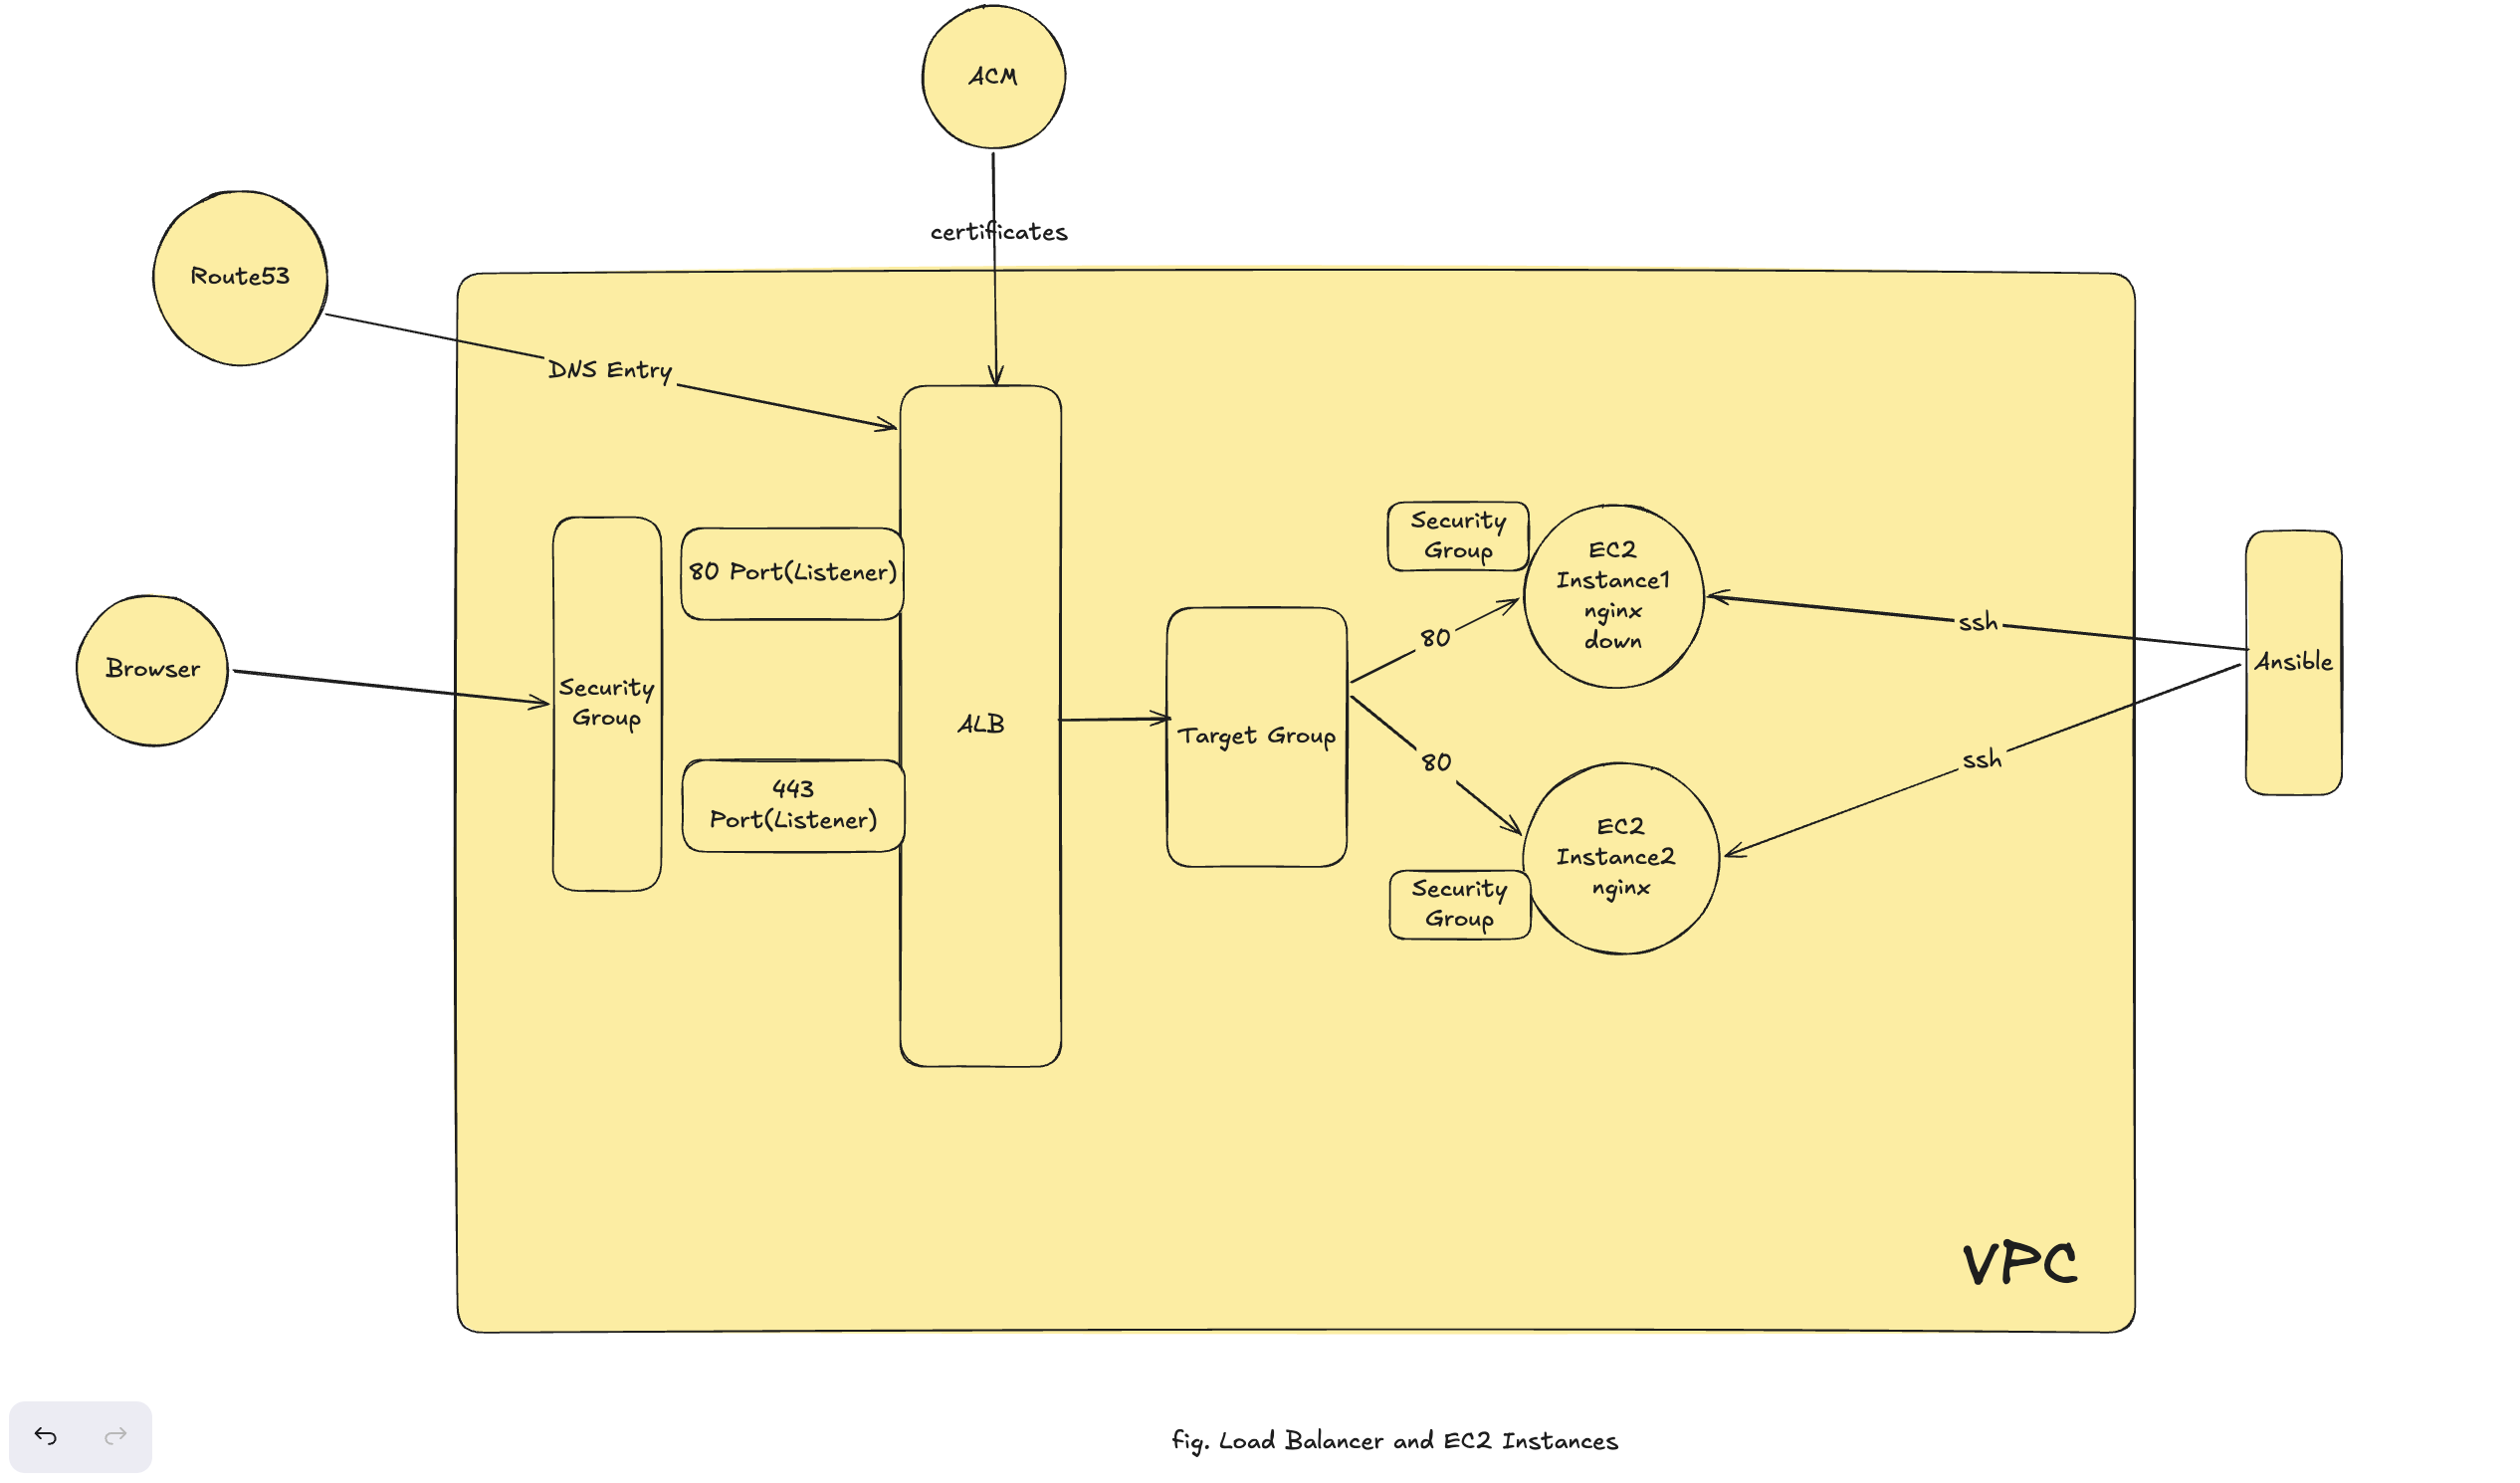
Zoom in / open the image in a new tab if the labels are hard to read.
Infra to create
| # | Infra | Module | Details |
|---|---|---|---|
| 1 | 1 VPC + 2 public subnets | vpc |
10.0.0.0/16, across 2 AZs |
| 2 | 2 EC2 + security group | ec2 |
Ubuntu 24.04, t3.micro, SSH key pair attached; SG allows 22 from your IP, 80 from the ALB |
| 3 | 1 ALB + target group + 2 listeners | alb |
in the public subnets; :443 HTTPS (ACM cert) → TG, :80 → redirect to :443; TG :80 → both EC2 |
| 4 | Hosted zone + ACM cert + DNS record | hostedzone |
zone for <your-domain>; ACM cert for terraform.<your-domain> (DNS-validated); alias terraform.<your-domain> → ALB |
| 5 | Deploy the app | Ansible | install Docker + run an nginx container serving site.zip on :80, both EC2 |
Project layout
terraform-webtier/
├── .github/workflows/
│   └── terraform.yml   # fmt → validate → plan (PR) → apply (merge), via OIDC
├── modules/
│   ├── vpc/            # 1 VPC + 2 public subnets
│   ├── ec2/            # 1 EC2 + security group   (root uses it for 2)
│   ├── alb/            # ALB + target group + listeners (:80, :443) — takes the cert ARN
│   └── hostedzone/     # Route 53 zone + ACM cert (DNS-validated) + alias record
├── dev/               # root env — calls the 4 modules
└── prod/              # root env — same modules, different values
Run it through the pipeline
- Authenticate to AWS with the OIDC role (Section 3) — no keys in the repo.
- Keep state in the remote S3 backend (Section 4).
- The workflow runs
fmt/validate/planon every PR andapplyon merge tomain— provision dev and prod this way (a matrix over the two roots, or a workflow per env). - Route 53 delegation is a manual prereq — point your registrar's nameservers at the zone's NS records. (The first
applycreates the zone; once DNS propagates, the ACM cert validates.) - Deploy the app with Ansible — install Docker and serve
site.zipfrom an nginx container on port 80 on both EC2. Get it here:site.zip. Run the playbook from the pipeline too, afterapply.
Submit: your modules + dev/prod roots + the workflow, a PR showing the plan, the merge run that applied it, a screenshot of the padlock + your site, a curl run a few times hitting both instances, and proof of a clean terraform destroy.
Clean up (don't skip)
Destroy both environments when you're done
Trigger your destroy workflow, or run locally:
Further Reading
Watch
- 📺 Terraform with GitHub Actions — automating plan/apply in a pipeline
- 📺 Authenticate GitHub Actions with AWS Using OIDC — the keyless OIDC setup, step by step
Reference